It comes down to three simple, game-changing techniques: 1. Do NOT score the skin; 2. Low heat followed by high heat; 3. Keep the pork level using balls of foil. Perfect meat, perfect crackling … Every. Single. Time! . .
Slow-Roasted Crispy Pork Belly
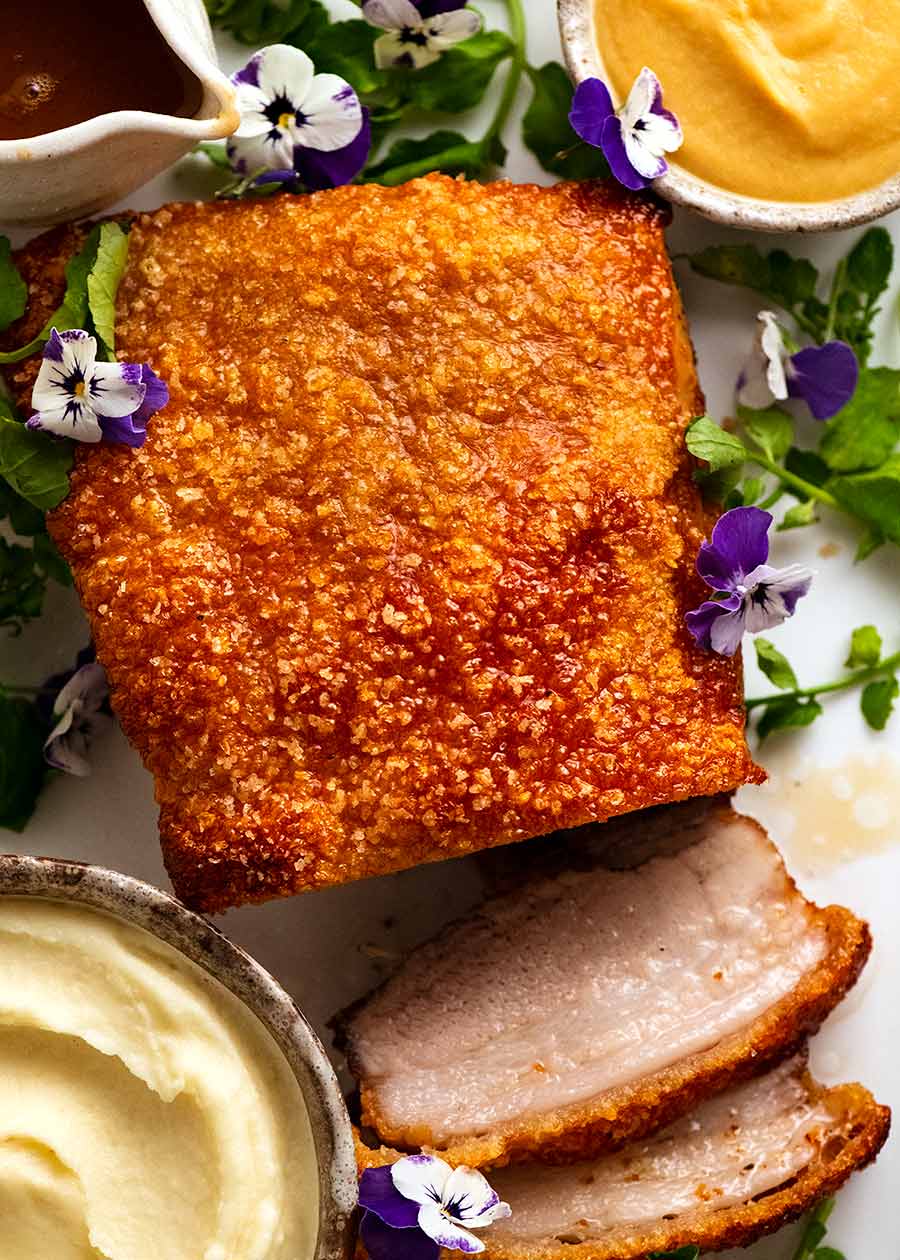
Now that you’ve scrolled past the photos above, is it fair to say I have your attention? 😉 When we’re talking about roasted pork belly, I feel like the pursuit of bubbly, perfectly crispy pork crackling goes without saying. And I assure you, the simple steps in this recipe are designed around delivering that end goal reliably, every single time! So, we can all agree on what defines awesome crackling, but what about the meat? For me, it’s about cooking it to that perfect point where the fat is oh-so-soft, the meat is extremely tender, but not so tender that it falls apart “at a touch” like pulled pork. I specifically want it to be sliceable (what is a roast, if it can’t be carved?) so it presents nicely, but is beautifully tender when you start eating it. We achieve this by firstly cooking slowly at a low temperature, while using a trick with foil to get a confit effect that keeps the flesh parts bathed in fat as it cooks. Finally we hit the pork with maximum heat to develop the amazing crackling! Like THIS. ↓↓↓ The best of both worlds!!
How to make Slow-Roasted Crispy Pork Belly: Overview
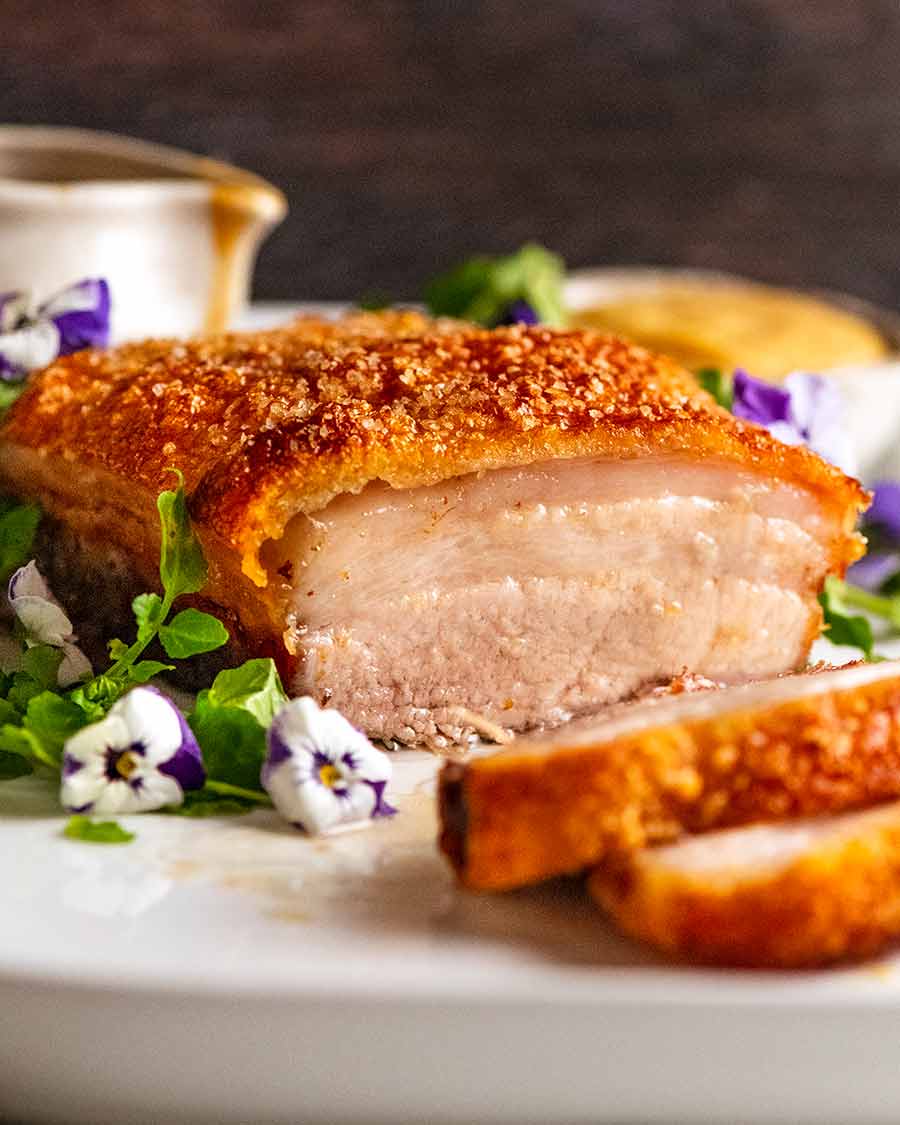
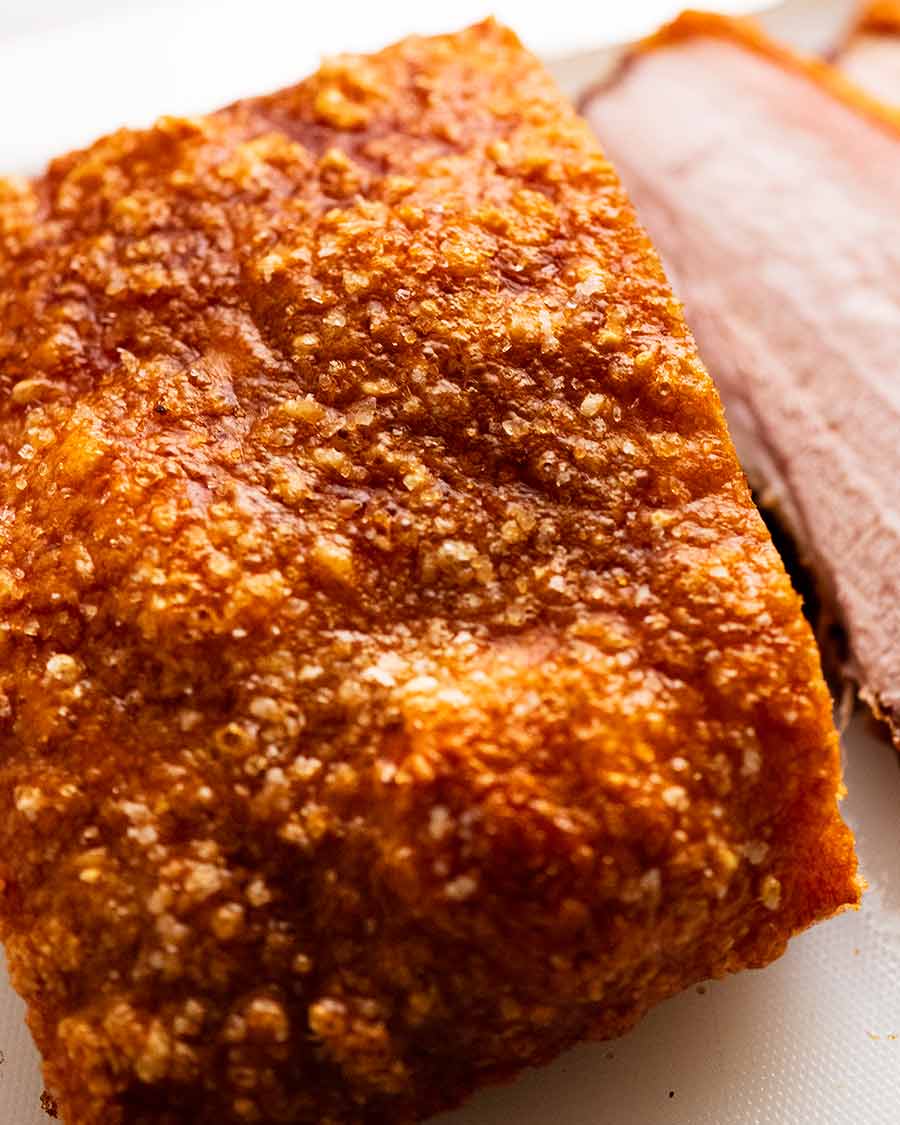
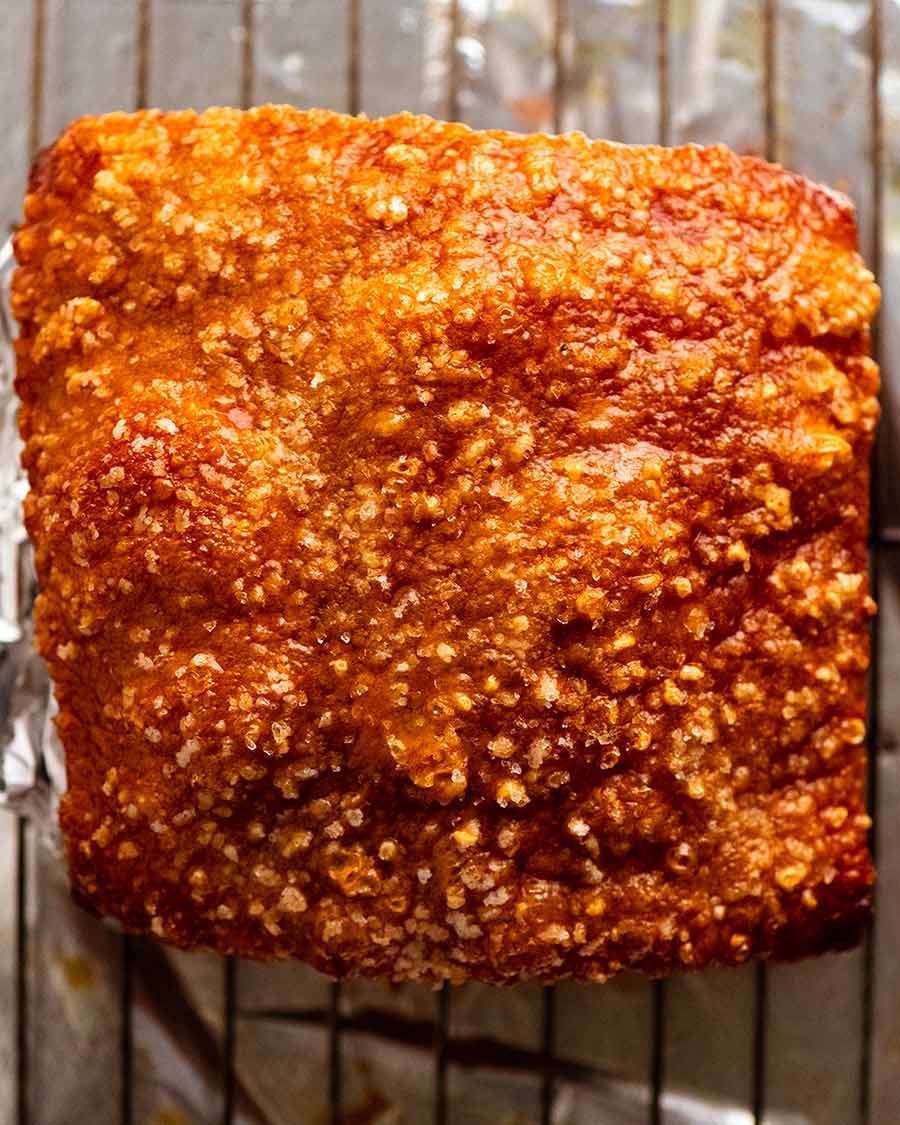
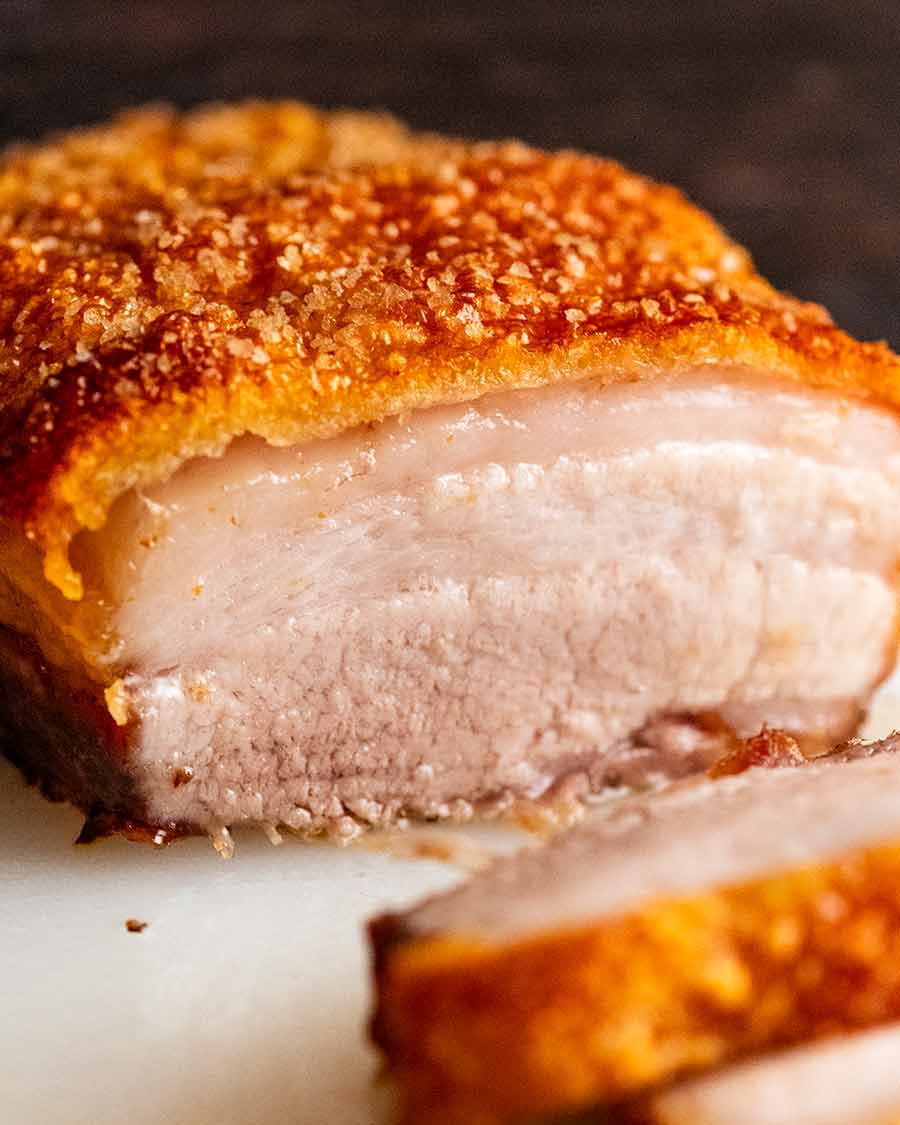
Here is how to make the best pork belly of your life, in 5 simple steps (read further below for the why): See below for my usual full instructions along with process photos! The result: The crackling will be ultra-crispy from edge to edge. What’s more, the crackling will have the perfect texture that we are looking for: Bubbly, puffy and crispy skin that shatters into a thousand porky shards in your mouth when you bite into it. Not that rock-hard, smooth-surfaced crackling you sometimes encounter that feels like is going to dislodge a tooth! Sure it’s crispy but it’s hard – and that stuff is just not pleasant to eat. Meanwhile, beneath our perfect crackling is ridiculously tender meat interspersed with layers of nicely rendered fat that’s soft and giving, so that each mouthful is a juicy, porky joy. My method is so insanely simple, yet yields such exceptional results, that it’s almost unbelievable. Let me reiterate again. You are 5 simple steps away from THIS!!! ↓↓↓
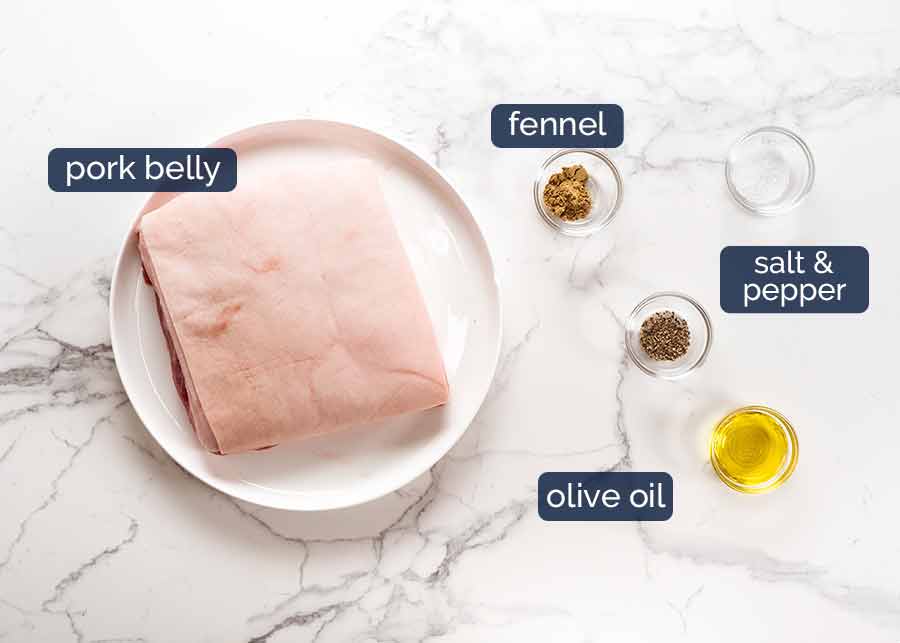
What you need to make the best Roasted Pork Belly of your life
Here’s what you need to make slow-roasted pork belly. Yes, really, this is ALL you need! Pork belly is such a flavourful and rich cut, that all we need is simple seasoning and some slow-roasting magic – you don’t need anything more!
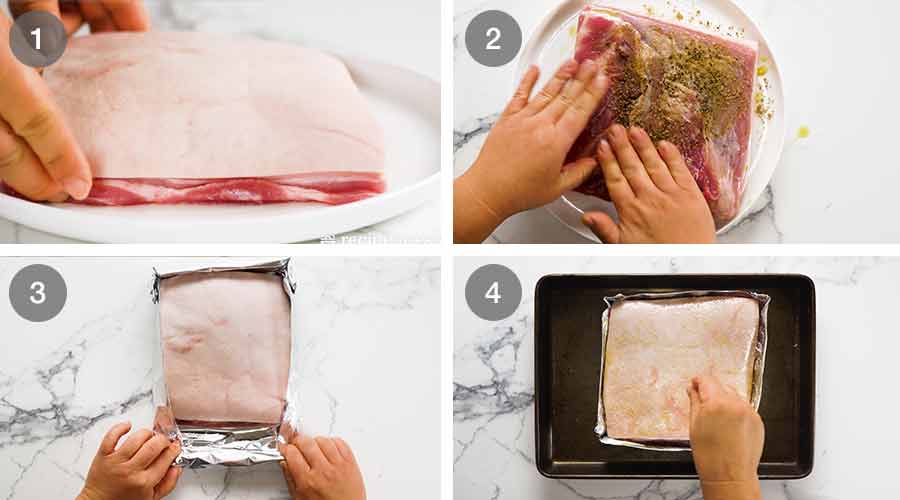
Pork belly – Here’s what to look for to find the perfect piece of pork belly!Even thickness – Look for a piece that is even in thickness as possible and at least 3.25 cm / 1.3″ thick, with nice layers of fat between the flesh. If it’s too thin, the flesh will cook faster and may become too tender before the required cook time needed to soften the skin in preparation for becoming ultra-crispy crackling;Even shape – A nice even rectangle or square shape presents nicer. But unlike the thickness, it is not as important for even cooking and great crackling;Flat skin – Seek out a piece of pork belly with dry, flat, and smooth skin as opposed wrinkled and wet like you can get with vac-packed belly. This is important for consistent crackling, and especially true where there are wrinkles – crackling never goes crispy inside the wrinkles;NO SCORING! That’s right, I’m busting one of the top myths out there about developing great crackling. There’s NO need to score the skin for perfect crackling! Not only is it unnecessary, it’s downright dangerous to the end result. Why? Well if you make even a small mistake with scoring you can compromise the crackling due to meat juices rising up and flooding the skin. And believe me, inexperienced butchers make that mistake all the time! More on my anti-skin-scoring philosophy below!Avoiding vac-packed belly is better – Freshly cut pork belly from the butcher is better than supermarket pork belly that’s been sitting in a vacuum pack for who-knows-how-long. Butcher meat is not only typically better quality, but as mentioned, vacuum-packed meat = skin soaking in wet juices + wrinkled skin = inferior crackling. While fresh pork belly = nice and dry, flat skin = amazing crackling. (This concludes my pork crackling maths lesson … 😂)You will still get awesomely crispy crackling with supermarket vac-packed pork belly IF you leave the pork uncovered overnight in the fridge to dry the skin out properly. But it’s still better if you get non vac-packed belly!Better quality pork = a better result – Not all pork is equal. The happier the pig, the better the quality of pork, and the better the end result. This means better flavour, more tender and juicier meat, and better crackling. So if you can afford it, source high quality free-range pork or the best pork you can afford from a butcher. Cheap pork belly can also sometimes be injected with stuff like brine which, contrary to belief, actually doesn’t roast up as tender (as I found out first hand once). One cheap supermarket pork belly took over 3 1/2 hours to become tender!Fennel powder – This is ground fennel seeds, either pre-bought or you can grind whole seeds yourself. Fennel is a classic pairing with pork, and the addition here adds a subtle floral, aniseed flavour that doesn’t overpower. It’s not the end of the world if you don’t have it, by the time the roast is done it has mellowed to a background flavour. The pork itself is the key taste here, especially because you get such great flavour development with the slow roasting!Oil – This is to make the seasonings stick to the flesh and skin, as well as encourage the crackling. Pork belly is so fatty, you don’t need to add extra fat! Any oil will work fine. I use olive oil; andSalt – This is so important for great crackling! You see all those bubbles on the skin? That’s caused by the application of salt. While I cannot explain the exact mechanism here, I can tell you that no salt = no bubbly crackling! You’ll just be left with a flat and hard sheet of skin, like you see on the side of rolled pork loins (because salt doesn’t stick to it).Sprinkling the salt evenly across the surface of the skin, from edge to edge, is key for great crackling!
How to make Slow-Roasted Crispy Pork Belly: In detail
I’ve summarised how to make this pork belly in a few short steps earlier. Here is now my usual process step description and photos with plenty of detail so you can be confident you’ll nail your perfect belly first go!
Even thickness – Look for a piece that is even in thickness as possible and at least 3.25 cm / 1.3″ thick, with nice layers of fat between the flesh. If it’s too thin, the flesh will cook faster and may become too tender before the required cook time needed to soften the skin in preparation for becoming ultra-crispy crackling;Even shape – A nice even rectangle or square shape presents nicer. But unlike the thickness, it is not as important for even cooking and great crackling;Flat skin – Seek out a piece of pork belly with dry, flat, and smooth skin as opposed wrinkled and wet like you can get with vac-packed belly. This is important for consistent crackling, and especially true where there are wrinkles – crackling never goes crispy inside the wrinkles;NO SCORING! That’s right, I’m busting one of the top myths out there about developing great crackling. There’s NO need to score the skin for perfect crackling! Not only is it unnecessary, it’s downright dangerous to the end result. Why? Well if you make even a small mistake with scoring you can compromise the crackling due to meat juices rising up and flooding the skin. And believe me, inexperienced butchers make that mistake all the time! More on my anti-skin-scoring philosophy below!Avoiding vac-packed belly is better – Freshly cut pork belly from the butcher is better than supermarket pork belly that’s been sitting in a vacuum pack for who-knows-how-long. Butcher meat is not only typically better quality, but as mentioned, vacuum-packed meat = skin soaking in wet juices + wrinkled skin = inferior crackling. While fresh pork belly = nice and dry, flat skin = amazing crackling. (This concludes my pork crackling maths lesson … 😂)You will still get awesomely crispy crackling with supermarket vac-packed pork belly IF you leave the pork uncovered overnight in the fridge to dry the skin out properly. But it’s still better if you get non vac-packed belly!Better quality pork = a better result – Not all pork is equal. The happier the pig, the better the quality of pork, and the better the end result. This means better flavour, more tender and juicier meat, and better crackling. So if you can afford it, source high quality free-range pork or the best pork you can afford from a butcher. Cheap pork belly can also sometimes be injected with stuff like brine which, contrary to belief, actually doesn’t roast up as tender (as I found out first hand once). One cheap supermarket pork belly took over 3 1/2 hours to become tender!
You will still get awesomely crispy crackling with supermarket vac-packed pork belly IF you leave the pork uncovered overnight in the fridge to dry the skin out properly. But it’s still better if you get non vac-packed belly! Sprinkling the salt evenly across the surface of the skin, from edge to edge, is key for great crackling! All your life, experts have been telling you that scoring pork skin is the trick to great crackling. I’ve heard explanations ranging from greater heat exposure to the need for fat to drip out and fry the skin. Well, all your life, these experts have had it wrong! Firstly, I do believe that the fat bubbling out from under the skin helps to make the crackling crispy. This is true. But a light rub of oil does the same job. And literally, I mean 1/2 tsp for 1kg / 2lb of pork belly. But secondly and frankly more importantly … People (home cooks, inexperienced butchers) botch the scoring all the time and this compromises the crackling. How? Well, the problem is if you cut through the skin and fat down into the flesh by mistake, even the tiniest prick can doom your crackling. This is because as the meat roasts, juices from the flesh will bubble up through that tiny hole and spread on to the pork skin. All that careful work to ensure dry skin is now wasted as the skin parts touched by those juices no longer can crisp and will end up rubbery! Even a small slash into the flesh can create a rubbery patch of 3 – 4cm / 1.5″+. The takeaway: Don’t score! It’s not necessary and it’s RISKY!
Part 1. Preparation
Part 2. Roasting
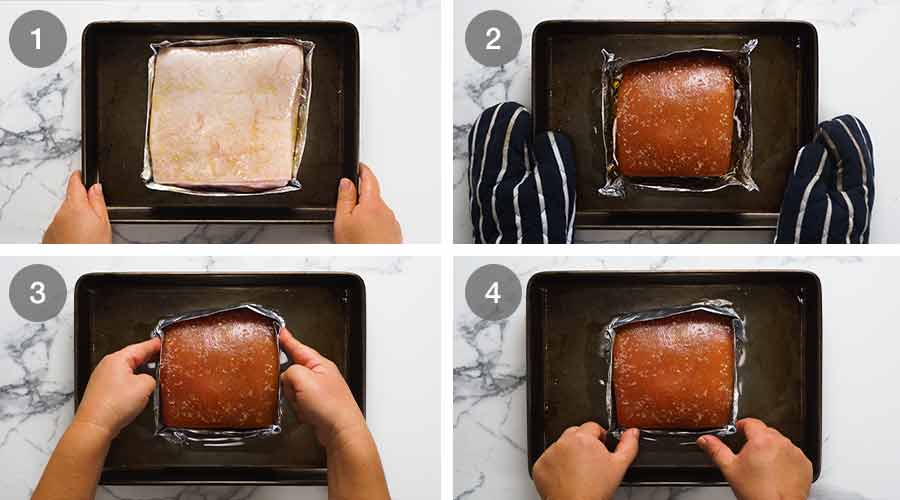
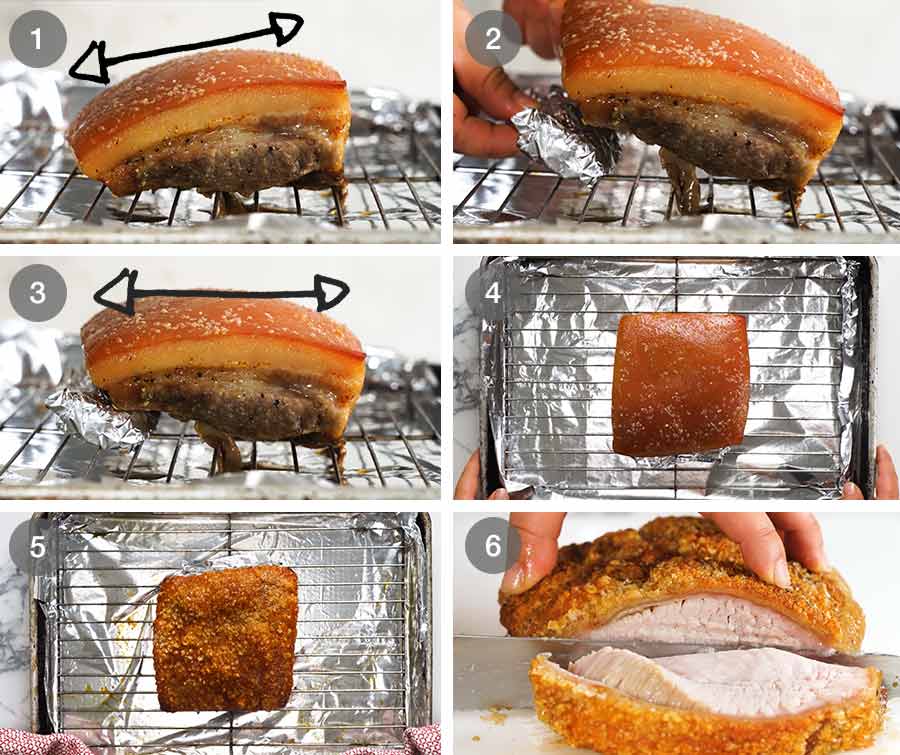
Part 3. Get cracklin’ – Level skin and final heat blast!
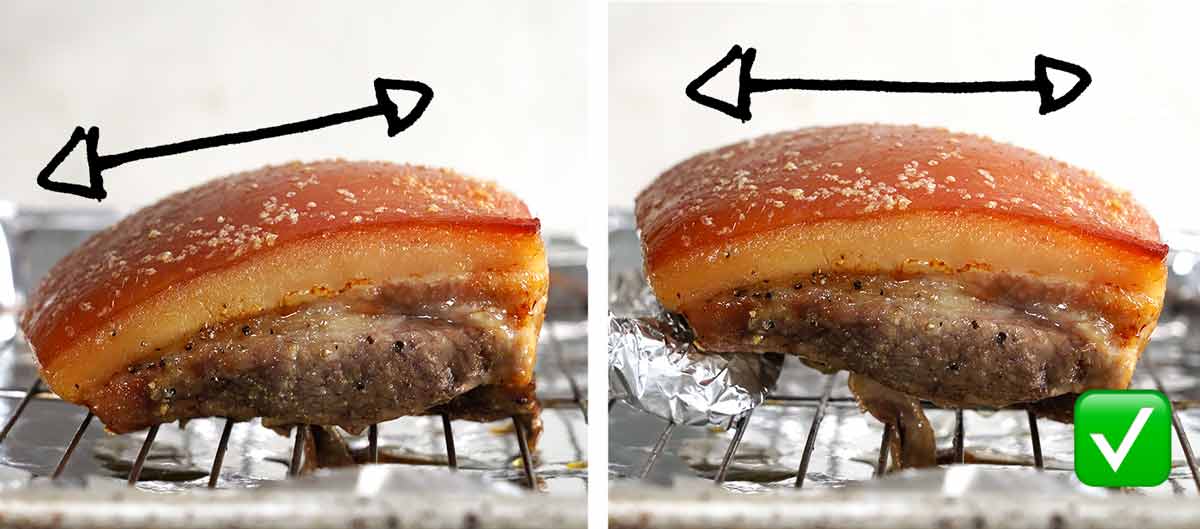
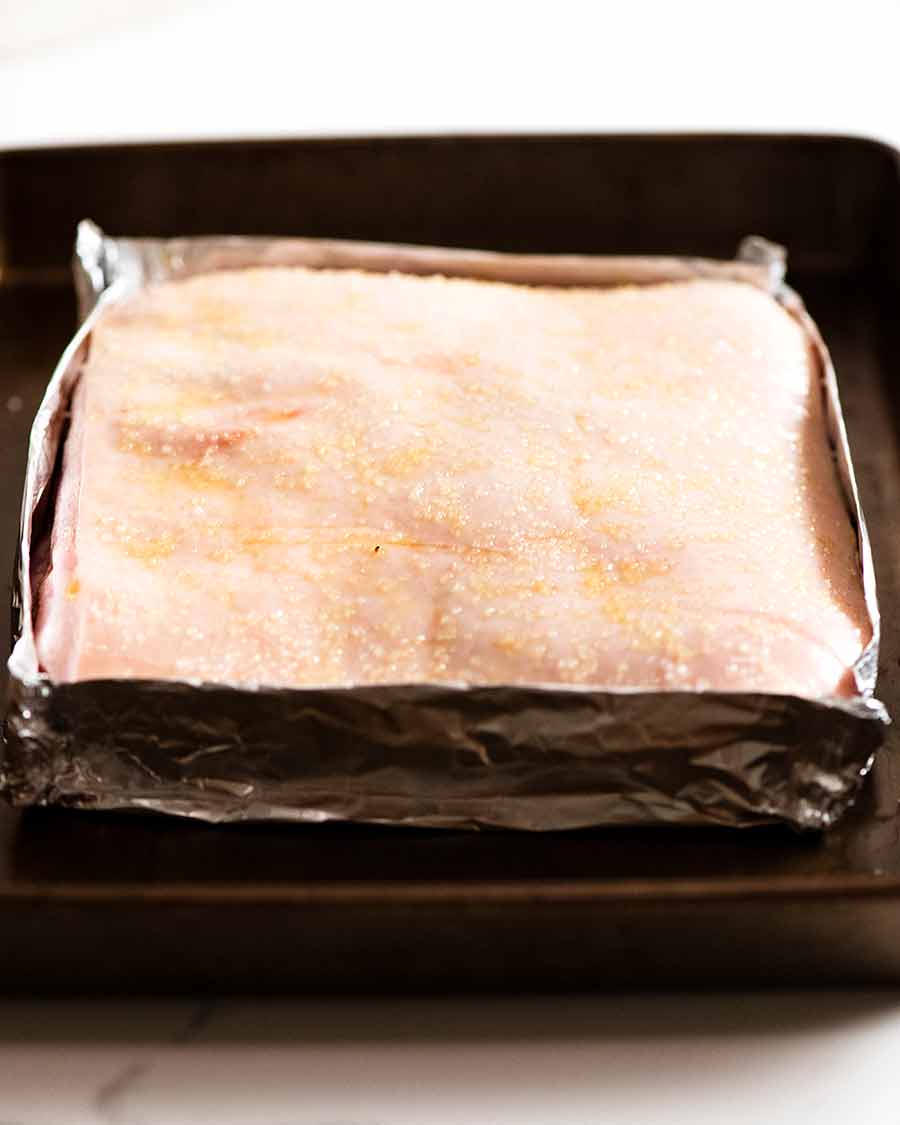
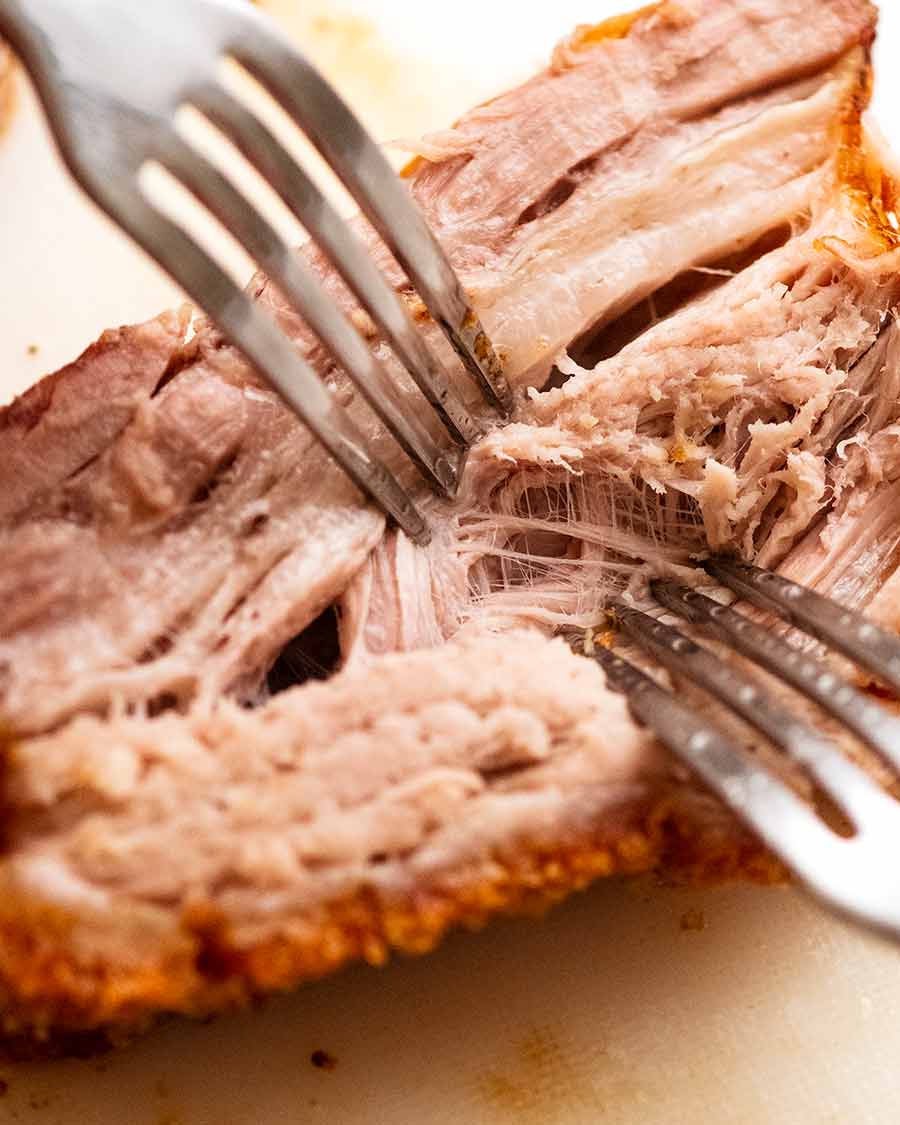
Level the pork skin – This is my not-so-little secret anymore for perfect pork crackling, tried and loved by readers from all over the world with my crispy Roast Pork Shoulder recipe! In this step, we use scrunched up balls of foil stuffed under the roast to get the the skin of the pork belly as horizontal as possible. An oven is always hottest at the top and cooler the further down you go, so this encourages even heat distribution of heat across the skin and in turn, evenly developed crackling. Without it, your crackling will be patchy, with some parts more likely to be burnt while other parts are underdone.It’s something I started doing after observing whenever I was roasting pork shoulder or belly. The meat would inevitably become a bit warped and skewed as it roasted, causing the skin to present a sloped surface even if it started out flat. When I then increased the heat to very high to crisp up the crackling, the highest points of the skin surface would crisp up the best, but would become burnt before the lower parts were done.The solution? Use balls of foil to prop the meat up to make the skin as level / horizontal as possible. This gives us crackling that cooks evenly, and perfect crackling every time! If you don’t have time for this, pat the skin dry very, very well using paper towels and/or tea towels. Your fingers should glide across the skin smoothly and there should be no sweaty, tacky feel to it at all; a) Protect the exposed flesh of the pork belly to ensure it doesn’t dry out during the 2 1/2 hours slow roasting time; and b) Catch the pork belly fat as it melts so the flesh almost cooks like confit. Confit is an age-old French technique where duck, pork and other meats slowly cook submerged in their own fat until incredibly tender. The fat moderates temperature, while preventing moisture and flavour loss. The extra flavour and juiciness you get simulating this method with this pork is outrageous. Outrageous! 🙂 Then place the foil-enclosed pork belly on a small (or regular) baking tray; and As counterintuitive as it might sound, keeping the pork skin initially soft is super-important during the slow roast phase. Without this, the bubbles that develop and harden into great crackling cannot form. If the pork skin becomes too hard too early during the slow roasting phase, the bubbles cannot expand to form the kind of crackling we’re after when we get to the high heat final stage. And it’s a very sad occasion indeed, when this happens. (I found out myself first hand that this occurs at around 170°C/340°F when I got impatient one day and tried to fast-track crackling – failing miserably!) 2 1/2 hours is the amount of time it takes for a 1 kg pork belly that is 3 cm / 1.2″ thick to roast so the flesh is very tender, but not to the point that it “falls apart at a touch” and is no longer slice-able. We’re not going for pulled pork here, this is a roast! But of course, we do want it beautifully tender. 🙂 With this explanation out of the way, here are the roasting steps. You don’t have to wait until you cook it – Turn on your sound and hit PLAY below for a quick preview! . Notice how this pork belly can be neatly sliced, as opposed to the meat shredding when sliced. If you roast for a total of 3 – 4 hours, you will get a “fall-a part tender”, pulled pork-type result. It still has great flavour but was just not what I was after here. But if you’re at all concerned about how tender the flesh is, it’s THIS tender!! ↓↓↓ Pork belly this good with meat this juicy actually doesn’t need a sauce. You have plenty of flavour in the flesh already – remember we seasoned it well, and it was cooking in its own fat which locks in tastiness. But I know there are many of you around these parts who are sauce fanatics (like yours truly!). Thus I wanted to go the extra mile to make a couple of special sauces, worthy of an amazing dish like this pork belly. So today, we’re going all the way and I’m sharing two beautiful sauces specifically created for this pork belly:
Apple Sauce; andVermouth Jus
Two special sauces for Slow-Roasted Crispy Pork Belly!
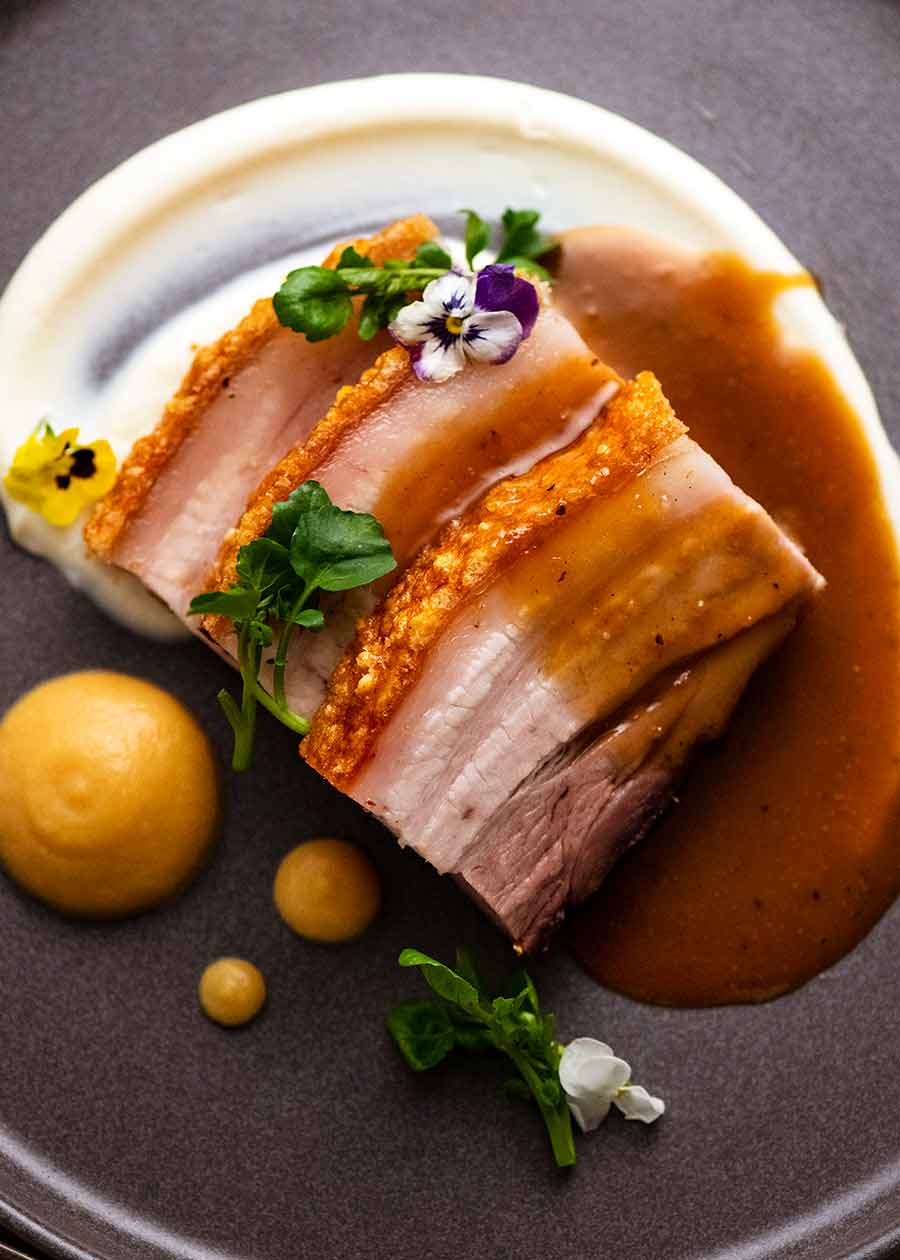
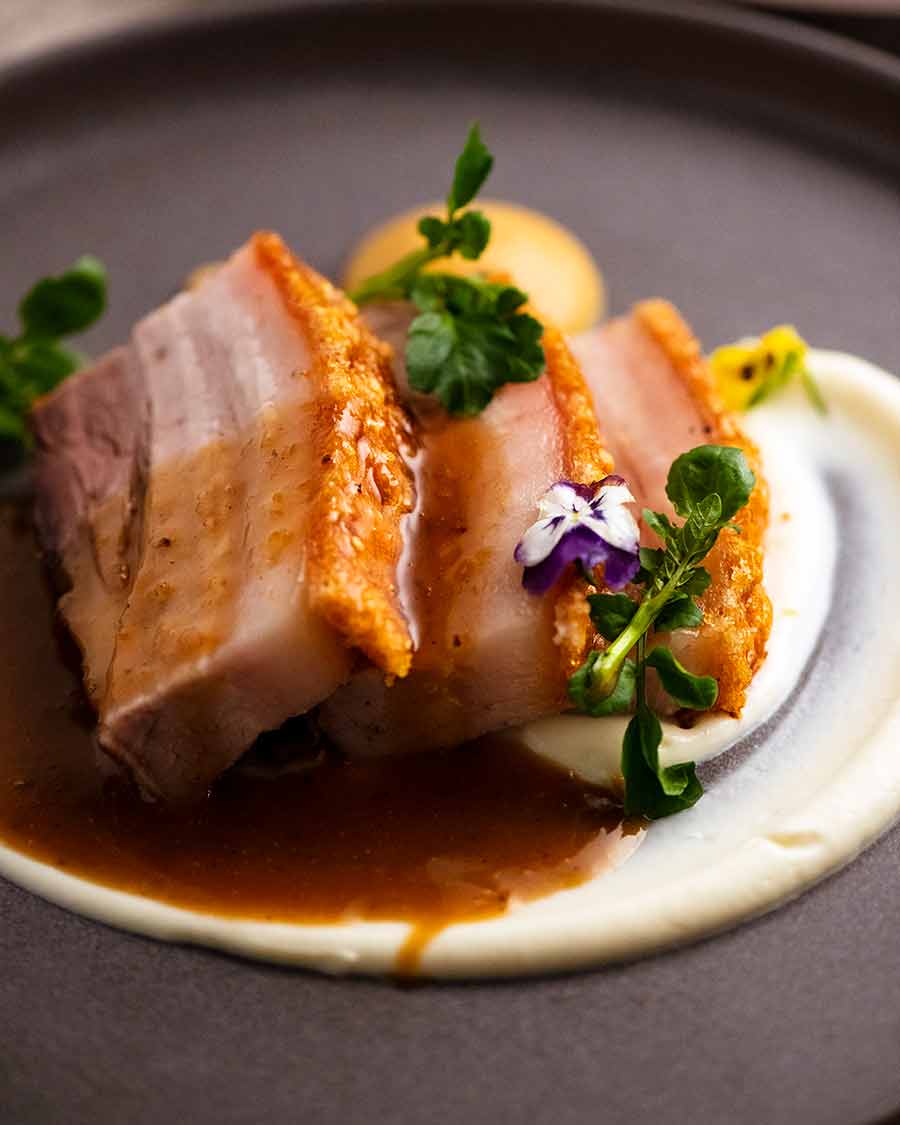
Bonus: How to plate up Pork Belly, fine dining-style!
Given I’d gone to all the effort of making two restaurant-style special sauces especially for this pork belly, I figured I may as well go all out and shoot for some poncy restaurant-style presentation too! You’ll see me putting the above plate together in the recipe video below. Here are the elements on the plate, in order of plating: Delicious as this thick puree of apple is, I did however feel that the Apple Sauce and pork needed a third player – some kind of meat-based sauce – to truly bring this pork belly dish together. I settled on Vermouth Jus, which is intended to be served with the Apple Sauce. Served as a trio, this is a stunner of a dish! Usually it is drizzled sparingly (and artfully) over carefully prepared plates of meat at pricey high end restaurants. Made with a heavily concentrated homemade beef stock with extra flavour and complexity thanks to the addition of vermouth, this jus catapults pork belly from “just” excellent home cooking into the echelons fine dining restaurant kitchens (in my humble opinion!). See this mouthwatering recipe here. Side note: If you’re wondering why it’s made with beef stock instead of pork stock, it’s because beef stock has a cleaner savoury flavour, whereas pork stock is quite… porky. Too porky. Especially in concentrated jus form!
Honey Mustard Sauce – Use the dipping sauce in Note 2 of my Chicken Tenders recipe. This sauce is a little bit sweet, a bit savoury, and goes perfectly with all pork!Dijon Mustard – Keep it simple with just a dab of good, plain mustard, straight out of the jar. Make sure it’s at room temperature and use the best you have!Salsa verde – The tangy profile and fresh herbs in this dazzling green sauce is perfect with rich pork belly.Cauliflower Puree – Typically I serve Cauliflower Mash as a side dish, but if you puree it up thoroughly so it’s completely smooth (as pictured in post), it will easily function as a delicious and elegant serving sauce.Pea Puree – Similarly, pea puree can do double duty both as a side dish and as a sauce. The colour looks particularly stunning against the golden brown, crispy crackling!Honey Garlic Sauce – Use the sauce in Note 6 of this recipe, but simmer it on the stove for a few minutes on low heat to reduce and thicken.Mushroom Gravy or plain Gravy – Because who can say no to pork with gravy, ever??Chimichurri Sauce – Take this pork in a South American direction with this piquant parsley/garlic sauce. It’s an excellent match with all kinds of proteins, and pork is no exception!BBQ Sauce – Go Southern USA-style by making a batch of the BBQ Sauce in this recipe and serve with the pork.
Cauliflower Puree – This is simply my Cauliflower Mash, pureed until completely smooth using a stick blender. Simply dollop a big spoonful on the plate, then smear in one fluid motion in a semi circle across the plate;Slices of Pork Belly – Slice about 1.5cm / 3/5″ thick, then trim so they are neat and all the same size. Fan a few slices on top of Cauliflower Puree ;Vermouth Jus – Just about 1 1/2 tablespoon is all you need here as it’s an intensely flavoured sauce. Spoon a little over the pork, and the remainder pooling next to the pork slices;Apple Sauce – Three little dollops, piped on using a squeeze bottle (or ziplock bag with the corner snipped). Alternatively make a single quenelle using two spoons. I am not huge on fruit with savoury foods, so this is enough for my taste. Bear in mind that you get plenty of flavour from the Vermouth Jus so the Apple Sauce is just to add a touch of fruity sweetness;Edible flowers – Over-excitement about my newly planted herb garden = excessive use of edible flowers lately! You do have to admit it looks pretty, right?? A small edible flower plant costs less than buying a container of edible flowers from the grocery store, and will keep producing. Get down to your local nursery! 😇Watercress – Just a littering of small watercress sprigs to add a touch of green to the plate.
And there you have it! My attempt at bringing a little fine dining class into my home, and hopefully demystify it for you too! How’d I do? 🙂 – Nagi x PS. Just for reassurance, you can bypass everything above but the pork belly and still be left with a plate of knee-buckling deliciousness. Make no mistake, the pork is the star of this recipe! Slice the pork belly, serve with mash, a green bean salad with a dab of Dijon Mustard or a simple homemade gravy as the sauce, and you’ll be eating as well as anyone tonight. Swoon!!!
Watch how to make it
Life of Dozer
Currently in Derby in Tasmania on a holiday with friends! So Dozer is on his own holiday – with the golden retriever boarder. This is how they start off every morning!