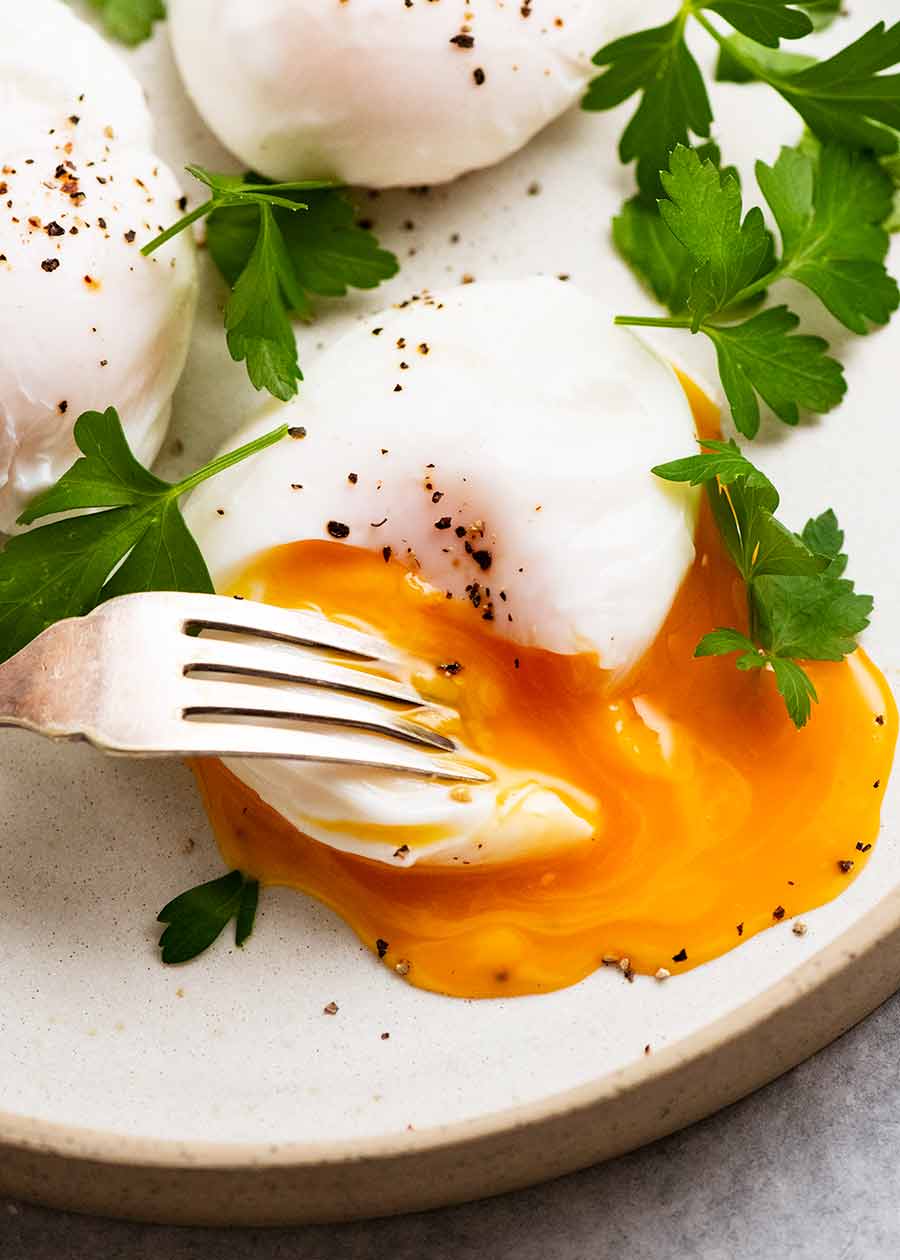
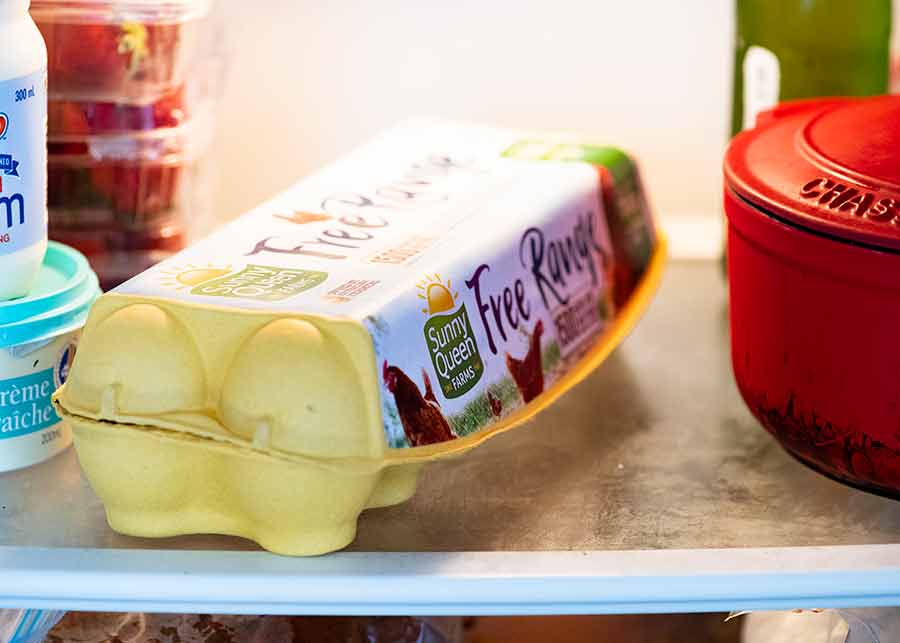
TWO BIG TIPS: strain your eggs to discard the watery whites that create a mess in your pot, and use fridge cold eggs which have better structure than room temp eggs. Sunday Eggs Benedict, here we come!
Biggest game-changer: Always strain your eggs
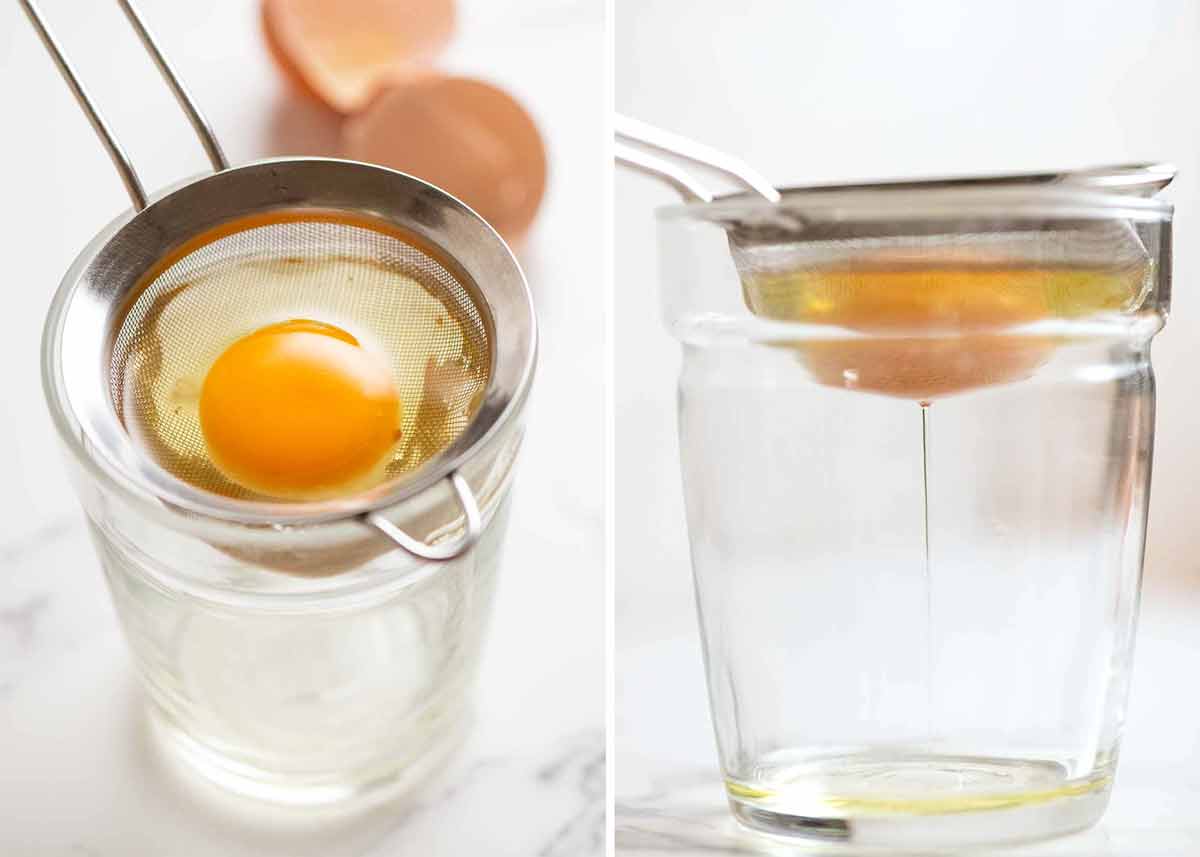
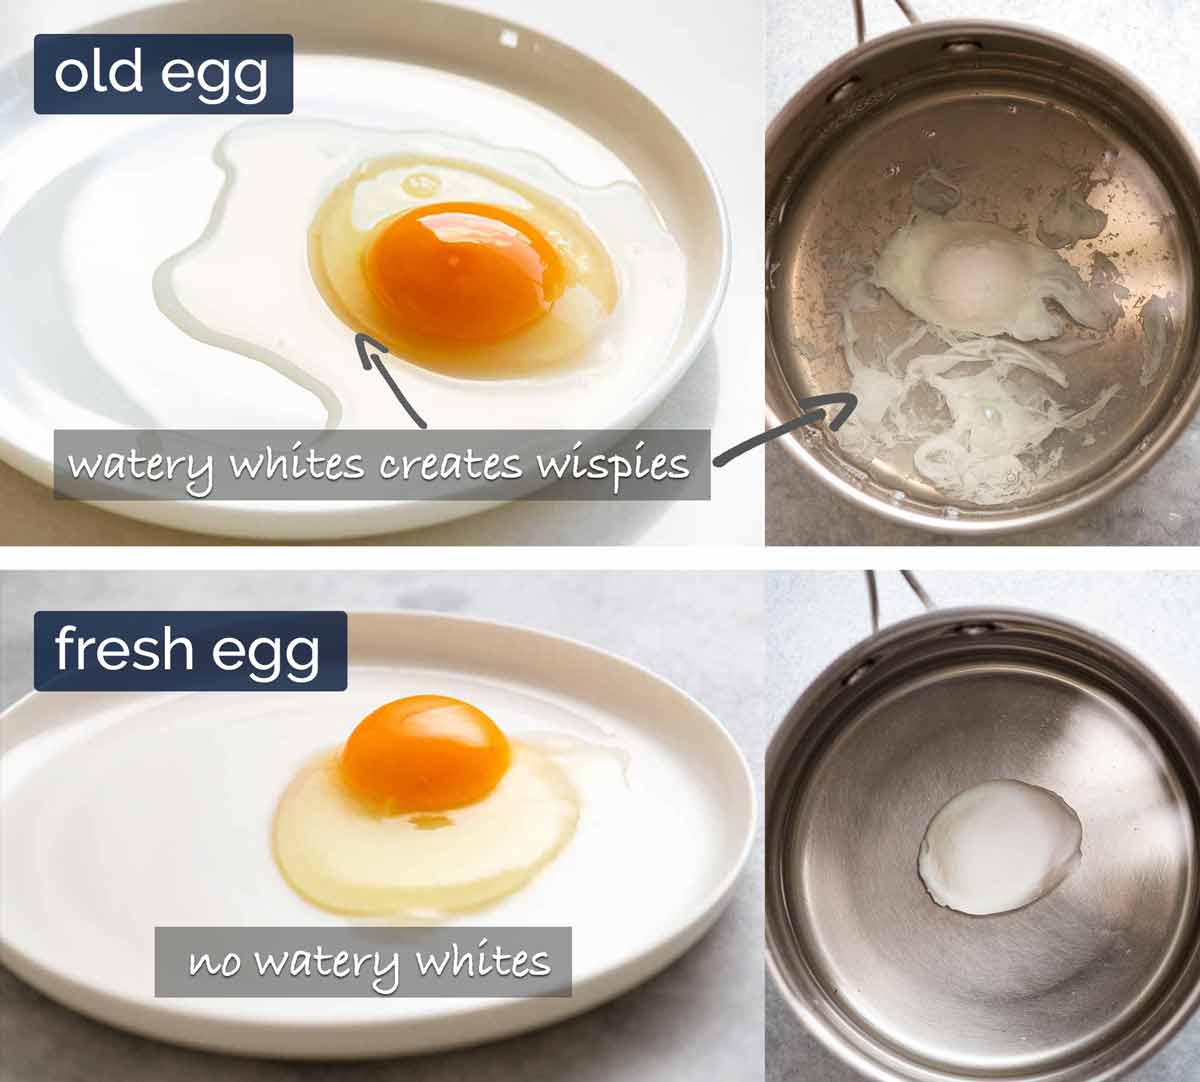
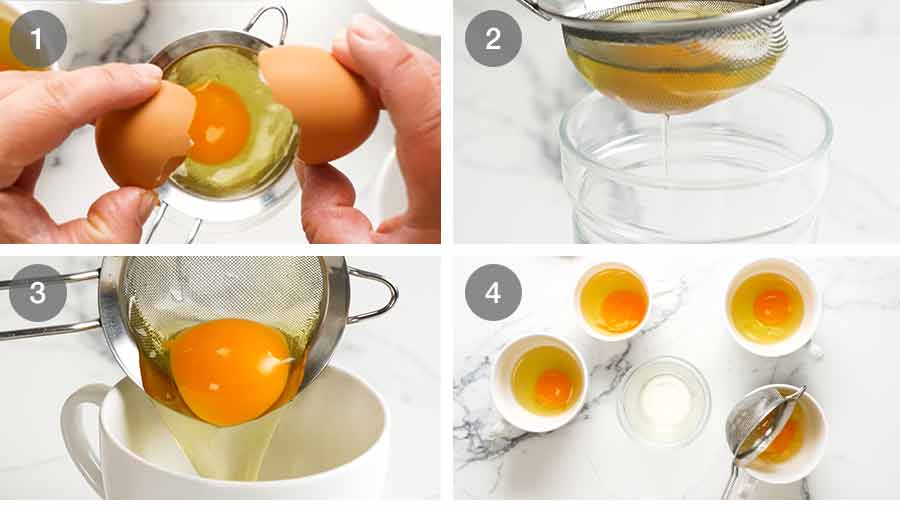
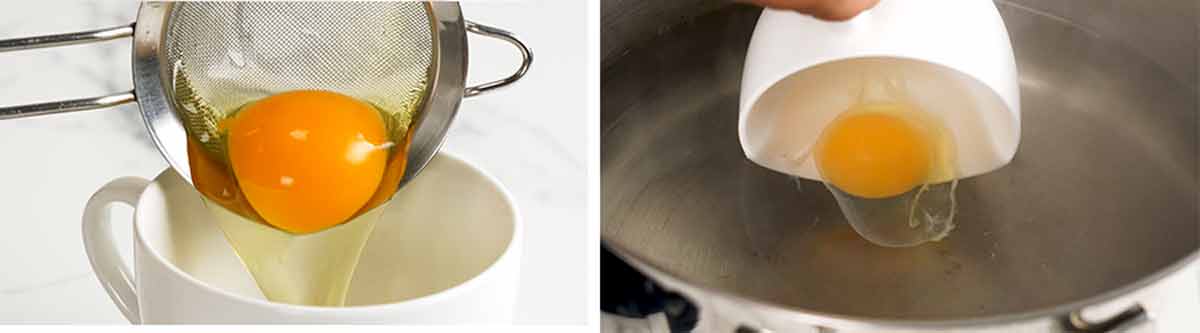
The single biggest tip that will change your poached eggs life is to strain the eggs to get rid of the watery whites that creates a mess in the water. The reason this is necessary is because the egg whites start to break down the moment the chicken lays an egg. Fresh eggs have tight “jelly-like” whites so you can literally crack them into hot water and you’ll pull out a perfect poached egg, no tricks required. In old eggs (~3 days+), the egg whites begin to break down and become increasingly watery which is what creates the frustrating white wisps that cloud your water and ruin the look of your finished egg. Most of us however don’t have the luxury of access to freshly laid eggs (I wish!!) and will have shop-bought eggs that usually have a degree of watery whites. To eliminate this problem, just strain the eggs!
How to tell how fresh your egg is
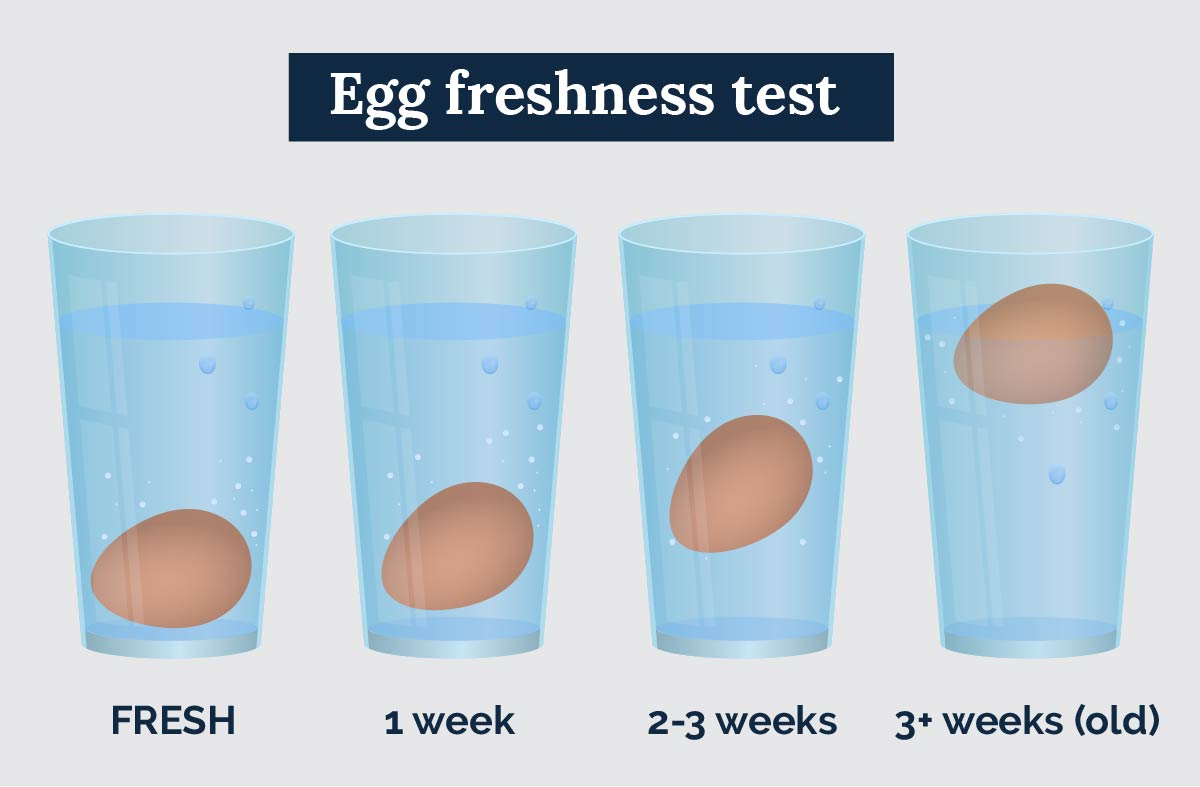
So we know with poached eggs that the fresher the egg, the better. But how can you tell how fresh your egg is before you even crack it? Here’s a quick tip: Simply put the egg in a glass of water and watch how it floats:
Egg shells are porous and over time an egg will absorb air. Therefore older eggs have more air inside than super-fresh eggs, and will be more buoyant when placed in a glass. 👍🏼 With the Easy Method, older eggs will end up with more of a fried egg or UFO shape. With the Whirlpool Method, the whites of older eggs won’t wrap around the yolk as well, causing untidy looking poached eggs. Rule of thumb: If your eggs are 1 weeks+ old, stick with the Easy Method to be safe.
Choose a Poaching Method
In today’s recipe, I’m sharing two methods to make poached eggs:
1. Easy Method
My “drop and roll” method. Use this method if you’re new to poaching or if you want to make up to 6 eggs at a time, or if your eggs are 1 week+ old.
2. Whirlpool Method
The traditional method where you stir the water to create a vortex into which the egg is dropped. Use this method if you have fresh eggs (<1 week ok), you’re just making one egg for yourself or just want the satisfaction of making poached eggs the way professional chefs do!
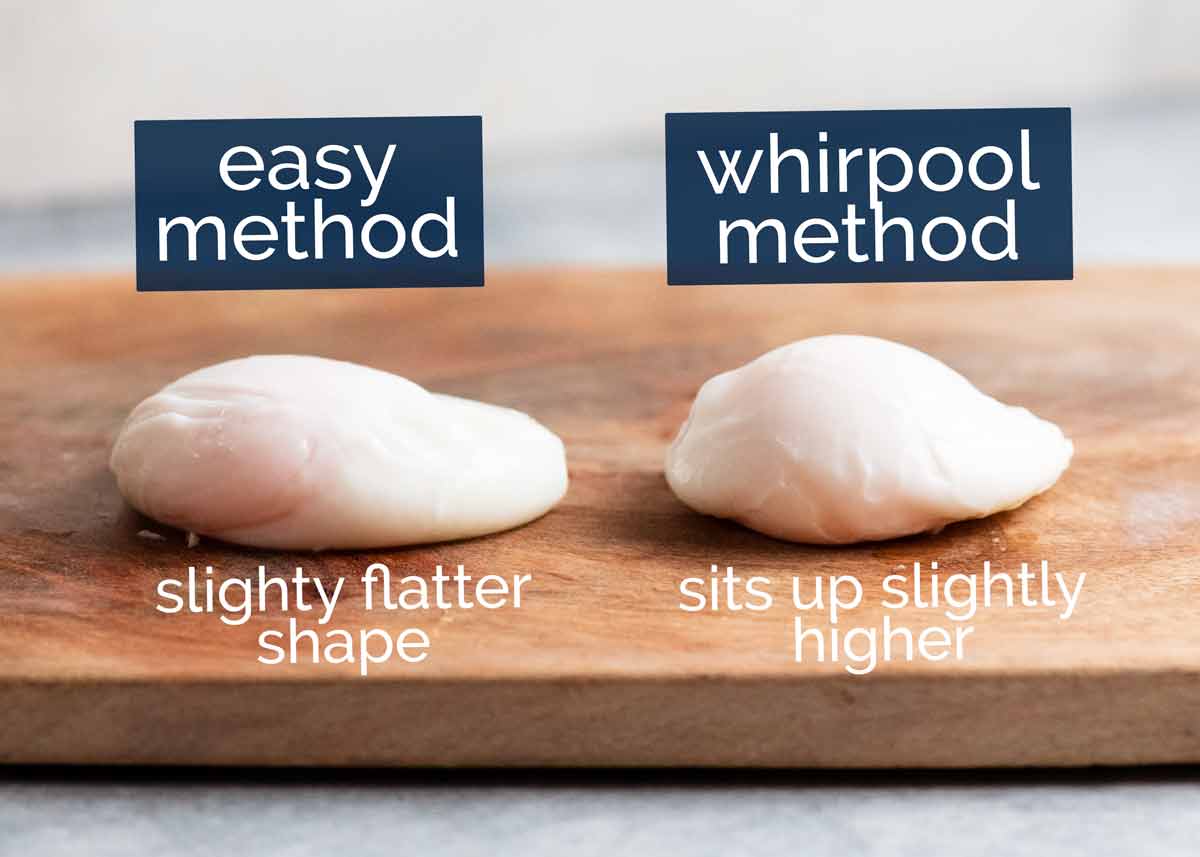
Difference between these methods
The difference between these two methods is just shape. The Easy Method tends to sit a bit flatter and sometime comes out a bit “UFO” shaped (the older the egg), whereas if you master the Whirlpool Method, you can make more technical “perfect” poached eggs that sit up high in an oval shape. Here’s a visual comparison:
The trade-off is that it’s difficult to make more than one egg at a time with the Whirlpool Method.
Poached Eggs – EASY METHOD
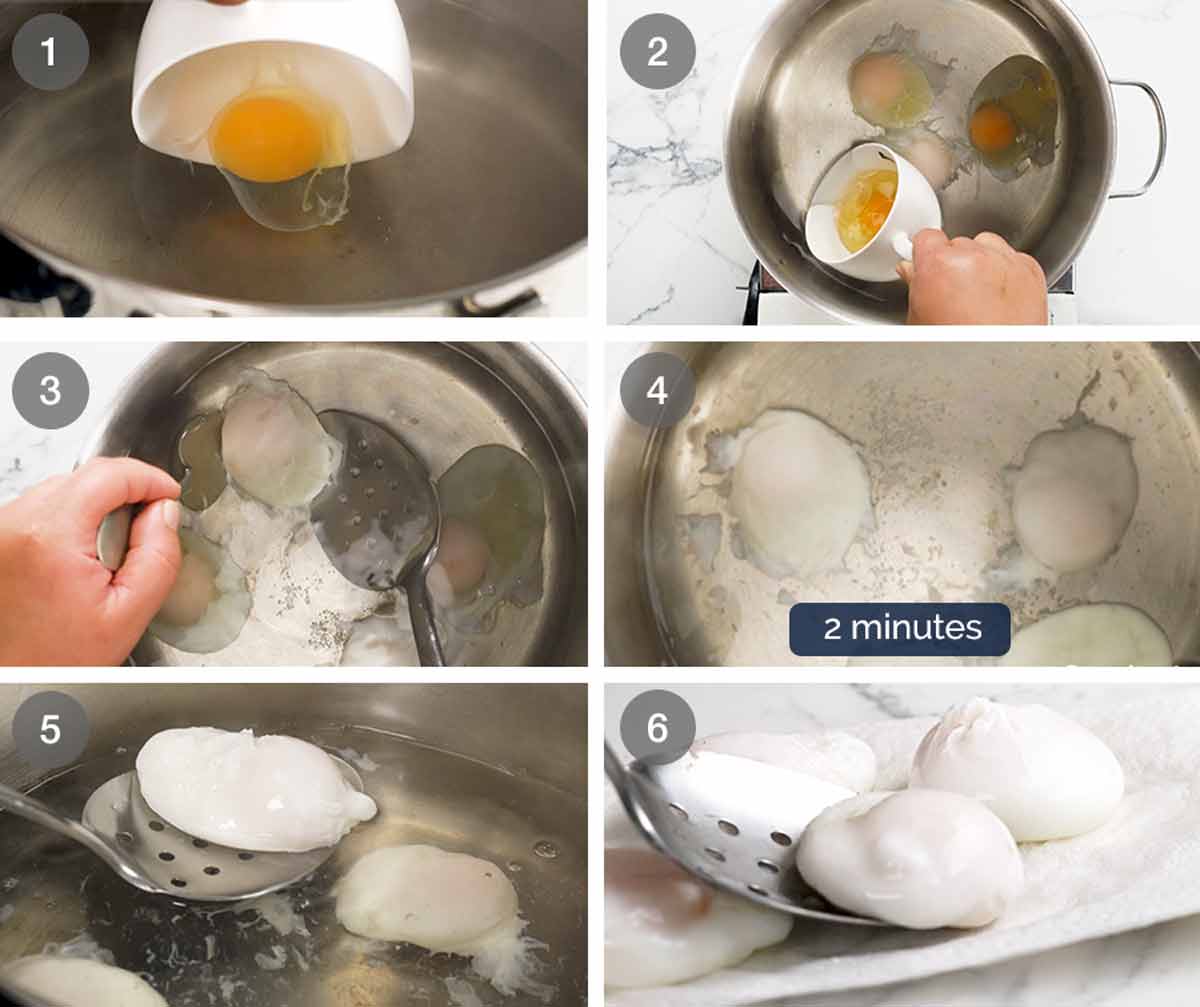
In this method, eggs are carefully rolled out into hot water using teacups, then turned to form the poached egg shape. Rolling the eggs into the water and turning before they are full set is what gives them the poached egg shape, rather than looking like fried eggs. They also cook evenly this way.
Use this method if:
You want to make up to 6 poached eggs at a time; Your eggs are 1 week+ old (use the diagram above to determine age); or You are new to poached eggs and just want a simple method that works.
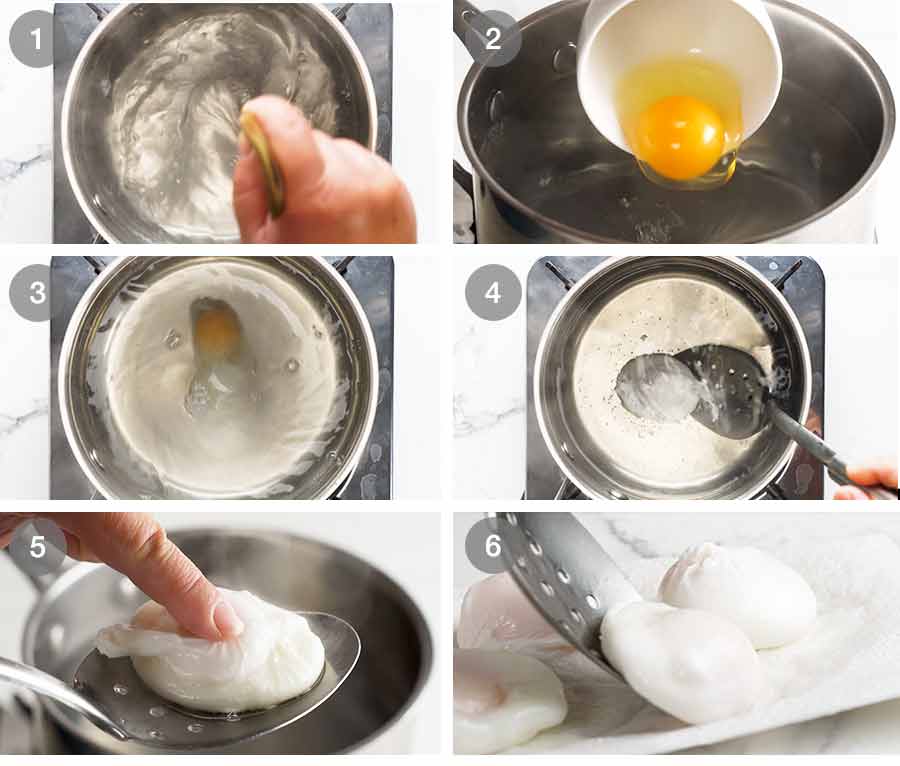
1. Strain Eggs
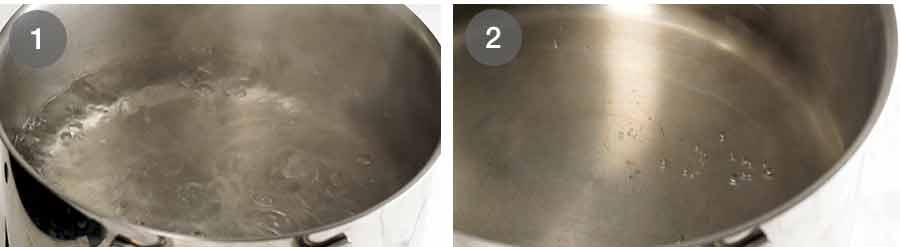
2. Right water temperature
3. Poaching the eggs (easy method)
Serve immediately while hot! See below for large batch poached eggs.
Why the Easy Poached Eggs Method works
For those of you who are interested, here is an explanation for specific directions in the Easy Method. If you’re not – just Jump to the Recipe or skip down to the classic Whirlpool Method section. (Or, to Dozer!)
1. Fresh eggs and straining watery whites
I’ve already covered these two key points at the top of the post so I’ll just recap briefly:
Fresh eggs are better for nicely shaped poached eggs with lots of egg white; See diagram at the top to tell how fresh your eggs are; When buying at the grocery store, choose the carton with the longest shelf date and be sure to strain them. Do this whether using the Whirlpool Method of the Easy Poached Eggs Method; and If your eggs are 3 weeks or older, you can still poach them successfully but you’ll find that you lose a LOT of the egg whites when you strain them!
2. Use teacups to gently roll eggs into the water = better shape
The height the egg falls will also affect the success of your poached eggs. If it has a long way to drop before it settles and/or starts to set, then the whites will splay everywhere and create a mess. So I use teacups so you can submerge it in the water then gently roll eggs out onto the base of the pot. Also, the ability to roll the egg out of the teacup helps with shape, essentially taking the place of the motion of the water in the Whirlpool Method (covered below). It’s also much easier to hold than a small bowl (says the girl who has accidentally dropped multiple bowls of eggs into hot water!). The teacup tip applies whether you’re using the Whirlpool Method OR my Easy Poached Eggs method – though with the Whirlpool Method, the teacup must not be submerged in the water because it breaks the whirlpool motion.
3. Fridge-cold eggs
Fridge-cold eggs have tighter whites than room temperature eggs which is why they are easier to separate when cold, but they whip up better into a stiff foam for things like Pavlova when they are at room temperature. Hence, using fridge-cold eggs helps the poached egg keep its shape rather than disintegrating into a mess when dropped into the water. It also partially compensates for not having fresh eggs because it partially simulates “tighter” whites. Also, having a cold yolk helps it stay runny until the egg whites are fully set. 🙂 Use of fridge-cold eggs applies to the Whirlpool Method too.
4. Bring to boil, THEN lower heat
The right water temperature is key to poached egg success. Water not hot enough = eggs dissolve into water before they set = murky pot of milky water. Boiling too rapidly = egg jiggles around too much and causes the whites to disintegrate. The best way round this – bring to boil, then turn it down so there’s no bubbles breaking the surface but there’s little bubbles coming up from the base of the pot, then immediately drop eggs in. This same water heating method applies to the Whirlpool Method too.
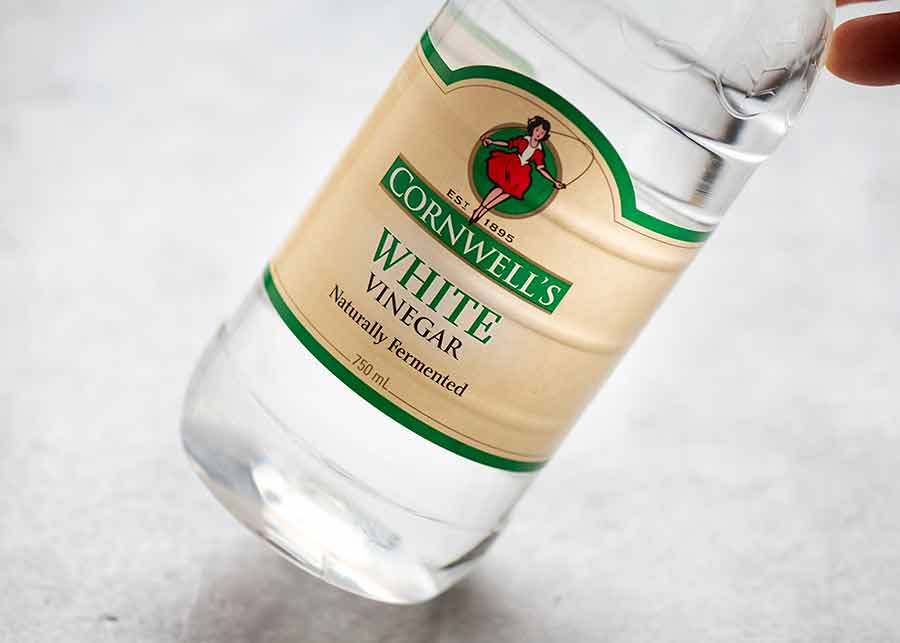
5. Vinegar – yes or no?
Having tried side by side poached eggs with and without vinegar, I’ve observed that vinegar does seem to make a marginal difference to help keep the whites together ie less risk of wisps. As for vinegar flavour, it actually takes quite a lot of vinegar to make the poached eggs taste vinegary. With just 1 to 2 tablespoons, it won’t absorb into the egg itself – but you will taste it if you don’t drain the egg before serving! Conclusion: use 1 – 2 tablespoons of white vinegar if you can’t break the habit or it makes you feel better to have a little extra insurance policy. I rarely bother.
6. Salted water – Yes? No?
I say no. Two theories underpin this idea of salting the water:
Theory #1: “It seasons the eggs while they poach”. My findings: You need a ton of salt to make a difference because it’s not cooking for that long. If you add enough for the eggs to absorb it, this will actually make the whites harder Theory #2: “Salt water increases buoyancy, helping to keep eggs elevated off the base for a ‘better’ poached eggs shape”. My findings: Firstly, this is completely irrelevant with the Easy Method because the egg settles on the base of the pot and it’s the rotation that forms the poached egg shape. For the Whirlpool Method, I observed zero difference using 1/4 cup of salt (which is a LOT!) so my assumption is that you’d need a ton of salt for this to actually make a difference. The speed of the vortex you create has far more of an impact on egg elevation.
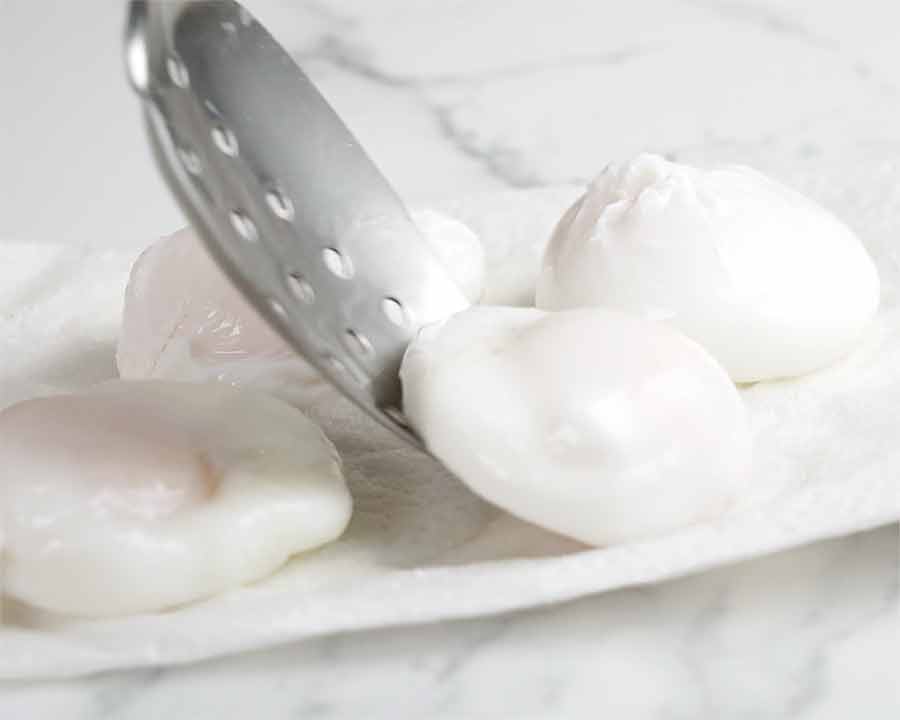
7. Drain eggs before serving
There is nothing worse than a watery poached egg placed served on toast. Nobody wants poaching water soaking into their bread!!! So always drain the egg on paper towels or a clean tea towel before serving. Leave it for at least 10 seconds so the residual heat steams the surface dry. After a minute, take them off the paper towel (or they’ll tend to stick!) and move them to a plate. Alrighty! Easy Method explained, now onto the Classic Whirlpool method – or skip to the recipe, recipe video or Dozer 🐶!
About the Classic Whirlpool Method
This is the classic method whereby water is swirled into a vortex before dropping an egg into the centre. The motion of the water makes the egg wrap around itself as it sets, forming that perfect poached egg shape. This method does take practice, and it’s imperative that you either use < 3-day old freshly laid eggs or strain the egg whites very well. General note: Just for your own interest, many (most??) cafes and bistros nowadays DO NOT use this method because it simply takes too long to make them. When you’re experienced, you can make two or three at a time by adding extra eggs after the first one has set and creating a new vortex for each egg. But it takes practice! I am not there yet, I keep destroying one of the eggs. 😩
How to poach eggs using the Whirlpool Method
Use this method if:
You’re making just one egg for yourself in a small(ish) saucepan; Are really determined to try to achieve a “perfect” oval shaped poached egg; or Want to feel a sense of accomplishment by making poached eggs the classic way.
DO NOT use this method if your eggs are 1 week+ old (see diagram at top of page to determine age of your eggs). The structure of old eggs is not good enough to withstand this method of cooking. Use the Easy Method.
Firstly, strain and place eggs in the teacup, as described above for the Easy Method. Also bring the water to a boil then lower heat, as described above. The thing about the Whirlpool Method is that you can make poached eggs with the “perfect” poached egg shape – like a football without the pointy ends, like this:
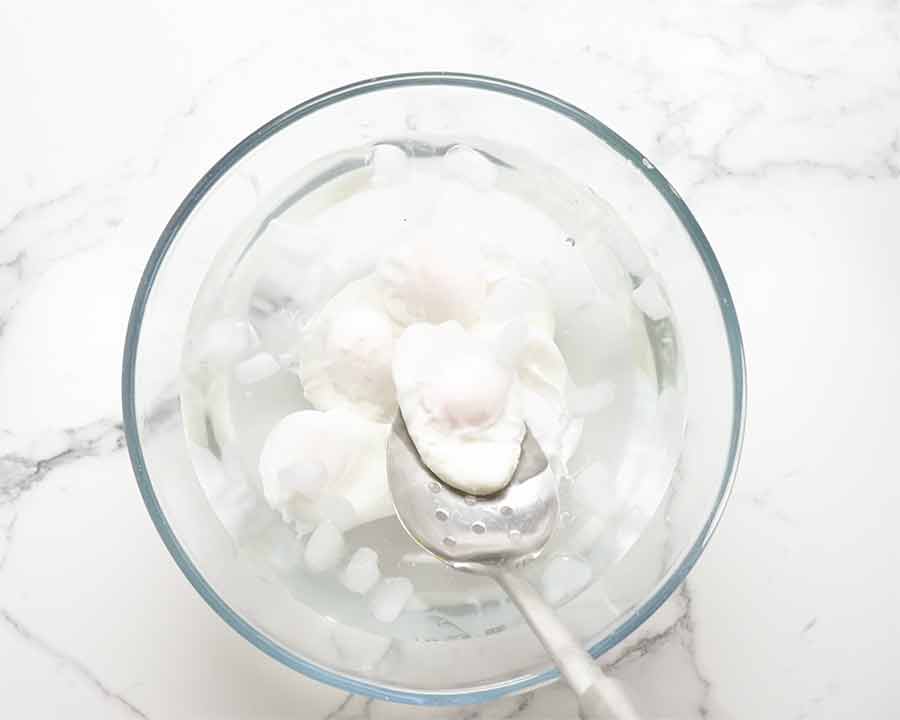
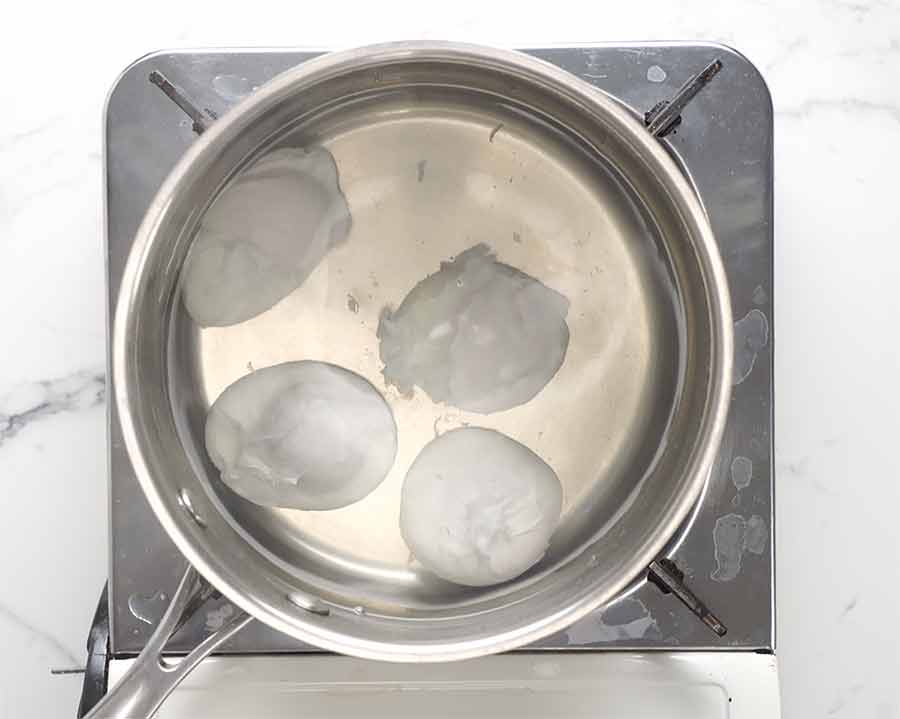
Batch eggs: How to poach lots of eggs!
To poach and serve loads of poached eggs, , just cook poached eggs using one of the above methods. Once cooked, simply slide them into a bowl of cold water. This will stop them from cooking further and keep them fresh until you’re ready to reheat. Cooked eggs are so dense, they do not absorb any of the water. This is how bistros and cafe prepare for busy weekend brunch service – ie they poach a stack of eggs ahead, then reheat to serve!
If you’re making loads and loads, add ice to the water to keep the temperature down to help them cool. But if you’re only making 6 to 8 eggs, then just cold tap water will be sufficient. These eggs can stay like that for 2 days in an airtight container in the fridge. To reheat, bring a pot of water to the boil, then turn the heat off. Then take 6 to 8 eggs out of the icy water using a slotted spoon, and lower into the pot. Leave for 30 seconds, then remove and drain on paper towels. In this short cook time, because they are start icy cold, the eggs won’t cook any further but just heat through – including the runny yolk.
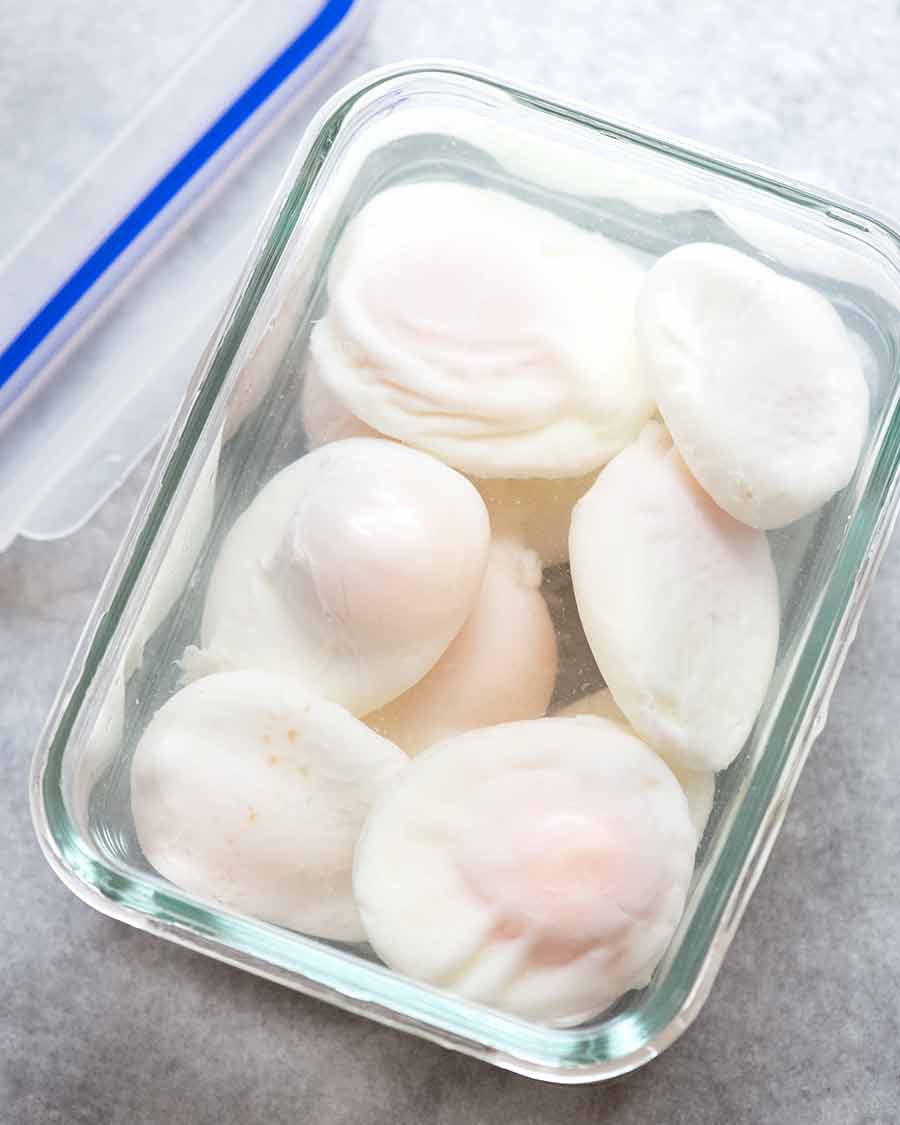
How to store poached eggs
Cooked poached eggs can be stored in water in an airtight container for up to 2 days in the fridge, then reheated per the above. Eggs are quite dense so they won’t absorb water within 2 days, but I have found that beyond this the yolks do get a bit watery.
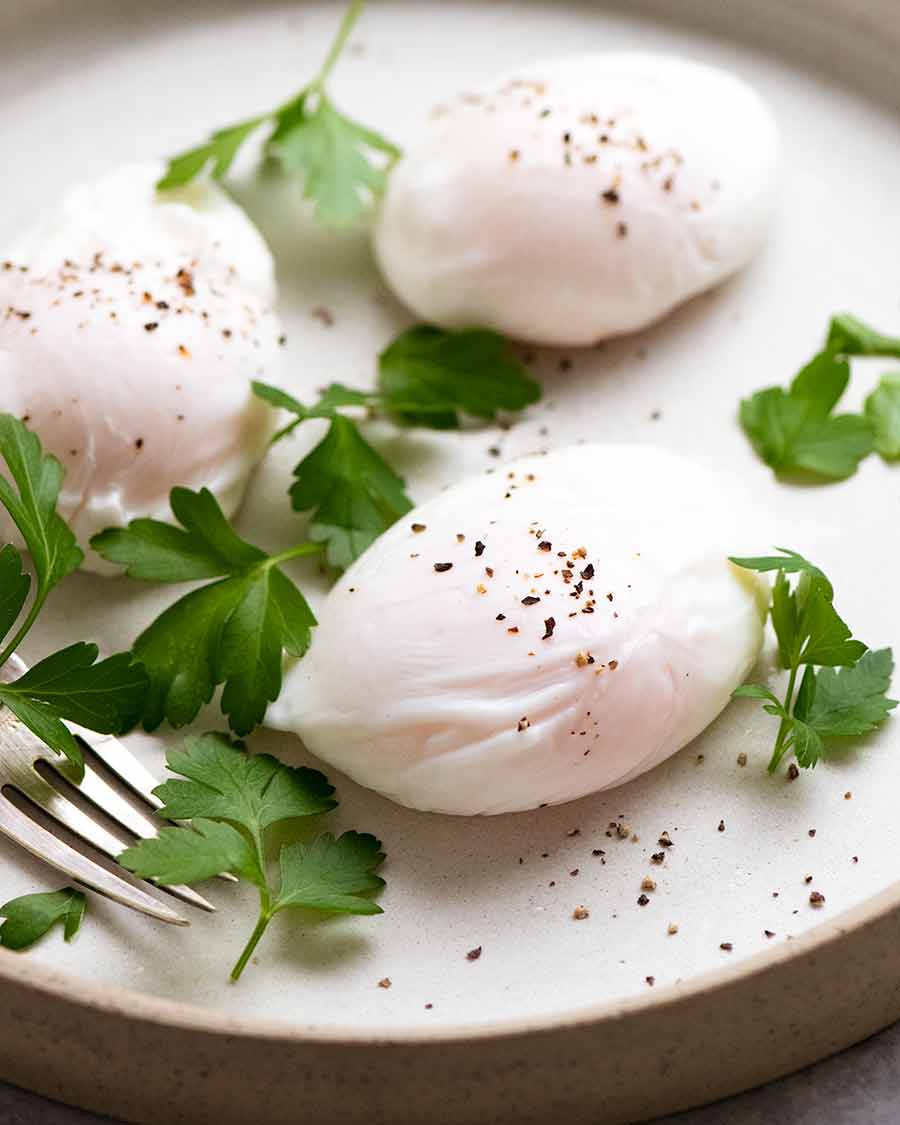
How to serve poached eggs
Here are some ideas for how to enjoy your perfectly poached eggs that you’ve just made without any stress at all, nailing every single one perfectly because you followed my tips and tricks!!
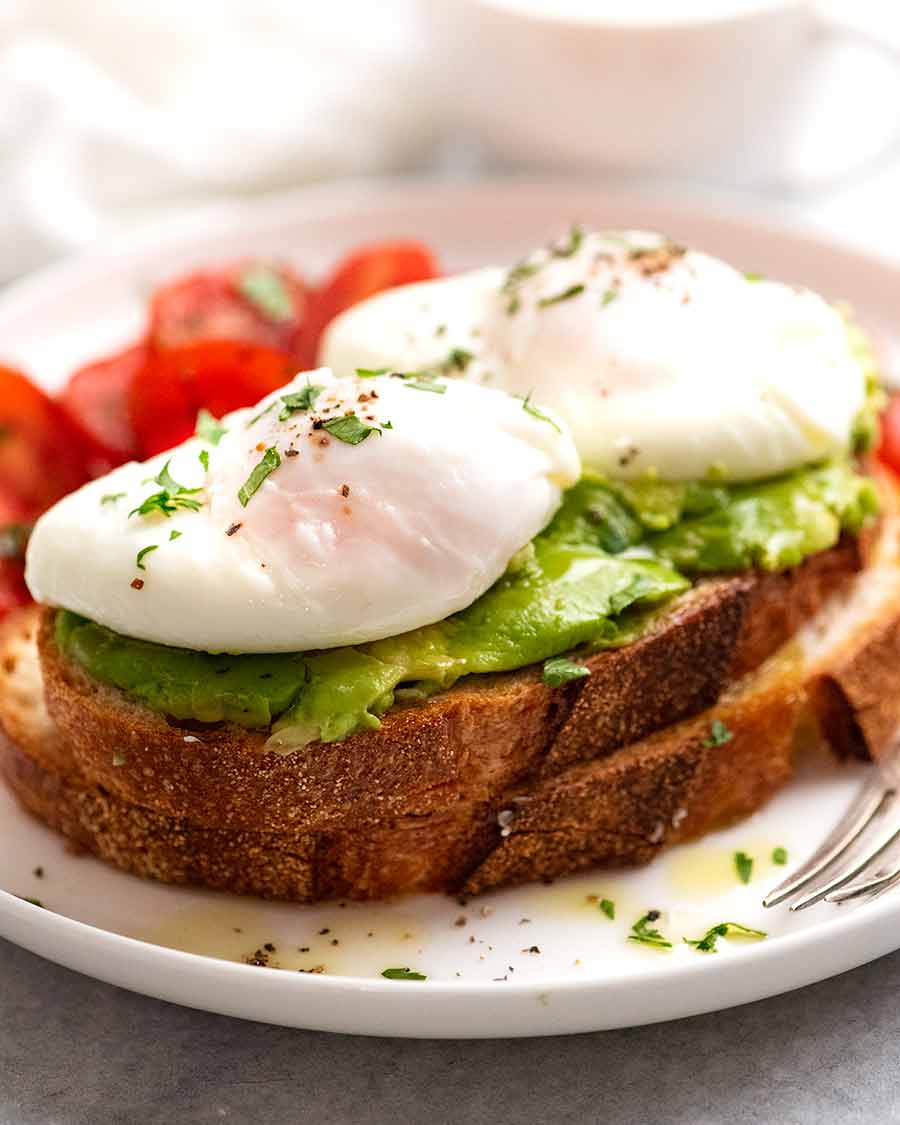
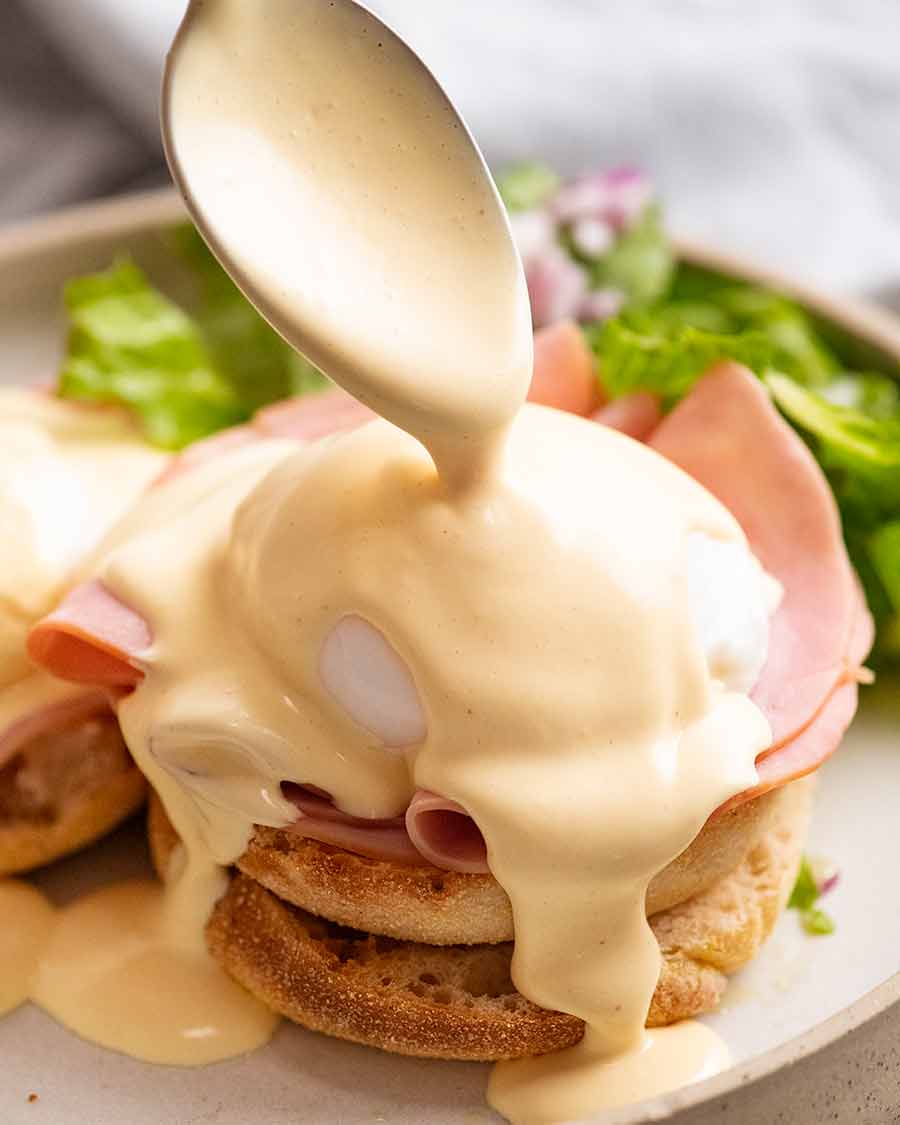
On toast – plain is just delicious, but with avocado it’s extra great! Make it extra special by making your own Crusty Artisan Bread – super easy, no kneading required. Eggs Benedict – on English muffins or other bread of choice, topped with a ham, bacon or smoked salmon, a poached egg then Hollandaise Sauce. See recipe here (psst – I use a super easy Hollandaise Sauce method AND it can be reheated!);
Eggs Florentine – where there’s Benedict, Florentine is never far away. Eggs Florentine is another highly popular variation of poach eggs with Hollandaise on muffins that uses cooked spinach instead of ham/bacon. This garlic sauteed spinach is perfect for the job. Over asparagus – another classic way to serve poached eggs. Take it over the top with Hollandaise sauce! On rice dishes – this is a terrific way to take any substantial rice dish and add an extra hit of protein plus “sauce” from the runny yolk to turn it into a meal! Think fried rice, curried rice or even my popular mushroom rice. Or gild the lily and pop one onto a plate of creamy risotto for a flamboyant finishing flourish … On Caesar salad – add a classy twist to Caesar salad by leaving out the boiled eggs and topping each serving with a poached egg instead; For a classic French Salad Lyonnaise – a dressed mix of bitter leafy veg and crisped speck lardons, topped with poached egg. On stewed or baked beans – eggs and beans are best mates. Try my homemade Heinz Baked Beans or Southern Baked Beans with Bacon piled over toast, with a poached egg on top for an extra-decadent touch. With potato rosti – either teamed plain with these crispy potato pancakes or stacked with some added protein (smoked fish, crumbled feta, ham), for a lovely European take.
And with that, you are now officially armed with everything you need for your new perfect (and dare I say, EASY!) poached egg life. Go forth and enjoy! – Nagi x
Watch how to make it
Life of Dozer
October pin up boy! (That’s a homemade doggie biscuit on his head 😂)